Submitting your lens
Time to submit
Once you are finished creating your lens and configuring the project info, it is time to submit! Start off by clicking the Publish Lens button up at the top left of the window. Lens Studio will take a few seconds to package everything up and then it will open a browser window for you.
If you are using a lot of images in your lens, you might get an error about the unpacked lens size being too large when trying to submit. If this happens, you'll need to optimize your images by resizing and/or compressing your images outside of Lens Studio. Once you've done that, try publishing your lens again.
If you not already signed in to your Snapchat account in your browser, you'll be prompted to sign in. If you are not redirected to a submission page after signing in, go back to Lens Studio, close the "Upload Successful!" dialog, then click the Publish Lens button again. This time your browser should open to the submission page.
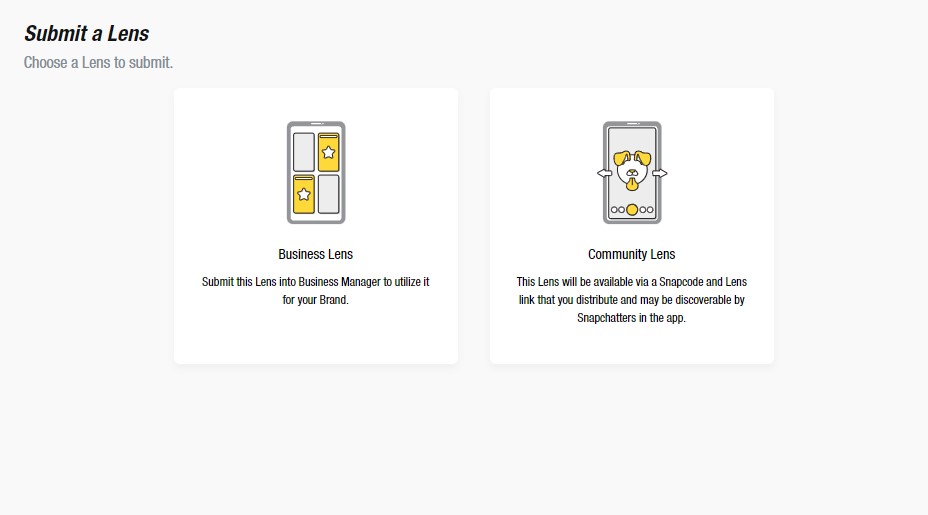
You may or may not see the option for a Business Lens. This option will only appear if you've been added to a business account to upload lenses intended to be run as ads.

Click on the Community Lens option. You can either submit a new lens or overwrite an existing lens. In this case I am submitting a new lens so I will choose that option.
Lens details
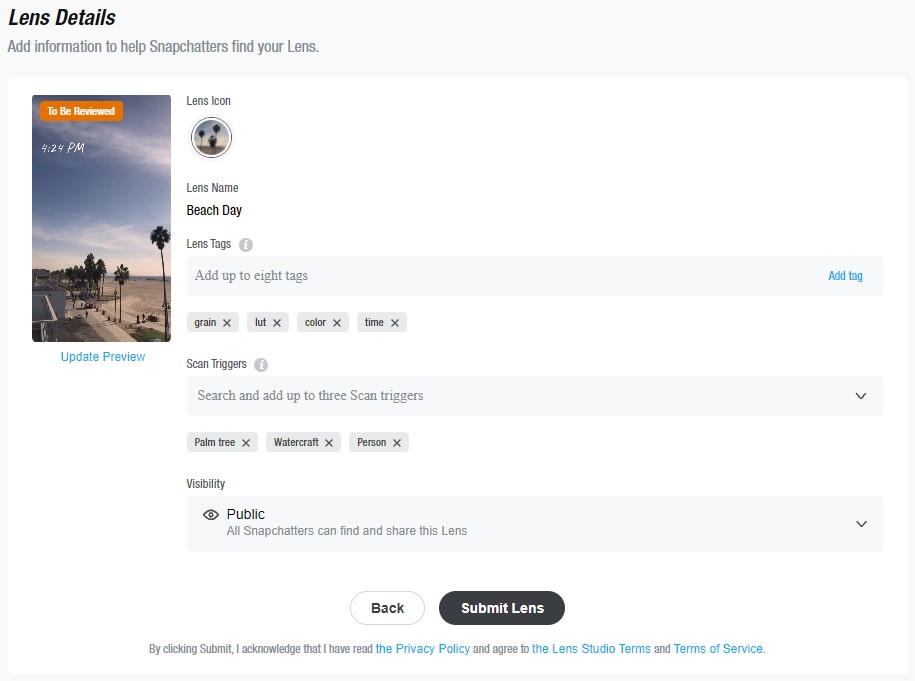
At this point you will see some info about your lens. If you want, you can change the preview video here. However, name and icon changes have to be done in Lens Studio and then the lens re-uploaded.
Lens tags
Lens tags are used to help people search for your lens. You can add up to eight tags and each tag must be at least three letters long and can contain no spaces. These are super helpful if your lens name is not directly related to what your lens is. For example, I named my lens "Beach Day" but that doesn't really describe what it does. One of my lens tags could be "grain" because that is part of what my lens does.
Scan triggers
Snapchat has a feature called scan that lets you long press in the camera view and it will use machine learning to try and recognize objects that are visible to the camera. Scan triggers let you link your lens to specific objects, so if you create a car themed lens you can select "Car" as one of your scan triggers. You can choose up to three scan triggers for a lens. If you click the dropdown you will only see a few options, but you can start typing to search and see if the object you want to detect is something that Snapchat can detect. Their list is somewhat limited, so try to keep your searches generic.
Visibility
There are three visibility settings for lenses:
- Public means the lens will appear on your profile and is searchable.
- Hidden means the lens will not appear on your profile nor in search results but is still useable via its link or snapcode.
- Offline means the lens cannot be used even if you have the link.

Submit
Once you are happy with everything here, click the Submit Lens button. Your lens will go through a review process and you will receive an email (make sure you have an email address associated with your account - this is done through the Snapchat app) letting you know if your lens has been approved or rejected. Lenses are usually approved, but sometimes rejection happens because there are technical errors and it doesn't run properly or you didn't follow the submission guidelines. Rejection emails will usually briefly describe what is wrong with your lens. Make sure you read the email so you know what to fix. If the email isn't clear, feel free to ask on the official forums and include screenshots of your lens, preview video, and your project in Lens Studio so that people can help assist you.
Where to share your lens
Once you've published a lens, you probably want people to use it! Here are a few ways you can share your lens.
Use it yourself!
The first and most obvious way to share your lens is to use it yourself! Use it when messaging friends, post something to your story with it, or make a Spotlight video with it.
Official forum
The official Lens Studio forum has a Share Your Creations section specifically for creators to share their work.
There is a subreddit dedicated to Snapchat lenses that is also a good place to share your lens.
If you are on Facebook there is a group on there for Lens Studio users. You can share your work and ask for help.
Physical media can also be a good place to share your lens. Snapchat launched an "Open Your Snapchat" campaign where they plastered snapcodes on the sides of buildings in various areas. You don't need to do anything that big, but adding a snapcode to a flyer or sign can also help people find your lens.
Lens analytics
Inside the My Lenses portal (where you finished the lens submission process from) you can access your lens stats. I won't go into detail here so as not to bore you, but I do recommend learning what each measure means.
Some of your lenses may never gain many views, some may gain billions. Don't ever let yourself be discouraged by how many views you are getting. I've had lenses that got hardly any views and then one day to the next got a bunch. A lot of it comes down to what is going on in the world of social media. As a quick example, I made a Daft Punk lens that didn't do great, but then a couple years later it took off for a few days when Daft Punk announced the end of the band. Sometimes it just takes time. Keep in mind that the first lenses you make might not be the greatest and that's perfectly okay - you are learning something new.
I like looking at my lens analytics to know which lenses are doing great and which aren't, but at the end of the day I make lenses because it is fun. Use the stats, but don't let them control what you are creating.
