Make things flop around with chain/swing physics in Lens Studio

Chain, or swing, physics can breathe a lot of life into your creations. With the proper setup, chain physics automatically adds swinging motion to elements of your lens. This can remove rigidity from objects in your scene and give everything a more organic feel. In this Lens Studio tutorial we will go over everything you need to know to add chain physics to your own lenses. You can see an example of this by clicking here or by scanning the snapcode below.
What are chain physics?
Chain physics (also sometimes referred to as swing physics) is the type of motion that comes from swinging something (like a chain). The reason a hair flip works is because when you stop swinging your head, your hair keeps going and will (ideally) get out of your face. Other examples are earrings swaying from your ears or flowers swaying on your head. Chain physics is a great way to add some organic motion to your lenses.
Get the scripts
Luckily for us we don't need to write any code ourselves. The Lens Studio team has done all the hard work and they even provide a template directly within Lens Studio. We could always open up the template and work from there, but maybe you have an existing project and want to add chain physics to that. Not to worry, it is a straightforward task to get what we need out of the template.
Open up Lens Studio and open up the Chain Physics template. If you are on the home screen you can select "Templates" over on the left-hand side and search for it. If you already have a project open you can go to File -> New Project from Template -> All -> Chain Physics. A sample project with some earrings and a flower on the user's forehead will open up. You can of course add your own resources to this template and go from there, but let's go over how to export the chain physics scripts in case you need to add this ability to an existing project.
The chain physics are controlled by three different scripts.
- JSMathLibrary
- ChainController
- PositionBasedDynamicsHelper
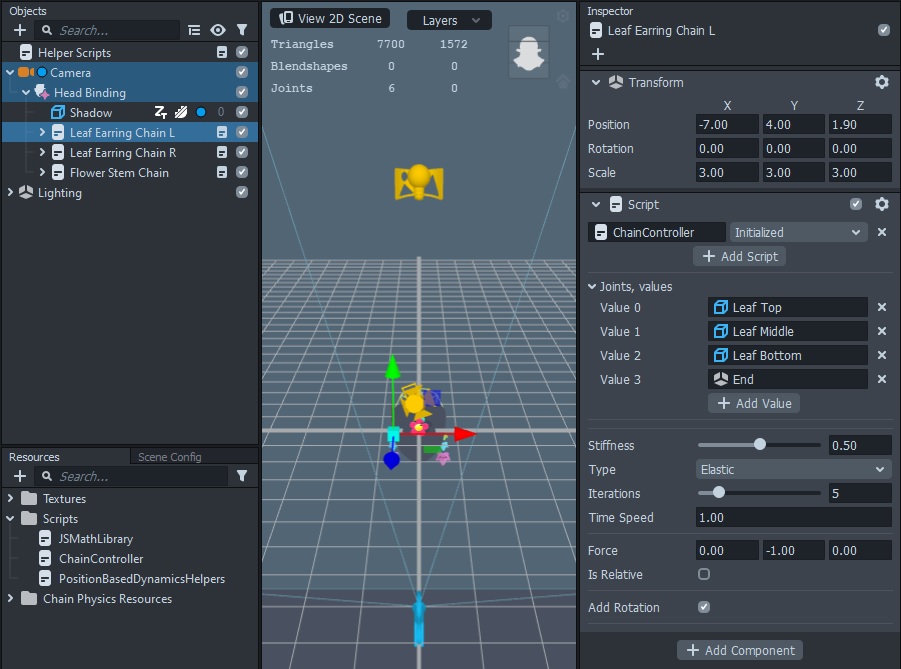
You can find all three scripts in the "Scripts" folder in the Resources Panel. If we take a look at the Objects Panel, we'll see a "Helper Scripts" object that contains the JSMathLibrary and PositionBasedDynamicsHelper. We don't need to mess with those scripts at all, we just need to make sure they are present in our scene. If you select one of the groupings of objects (Leaf Earring Chain L, for example), you'll see in the Inspector Panel that this is where we place the ChainController script and configure the chain physics. Don't remove any of the joints, but feel free to play around with some of the other settings to see how things work. Once you are ready, right-click each script in the Resources Panel and choose the Export option. You can import these scripts into any project, so save them somewhere useful where you will remember where they are.
Prepare your 3D model
For the chain physics scripts to work, we need a rigged 3D model. Now this is a Lens Studio tutorial, not a 3D software tutorial, so if you unfamiliar with rigging 3D objects, you will have to look that up on your own. That being said, I'll still be going over everything at a high level (my 3D software of choice is Blender, but feel free to use whatever you wish).
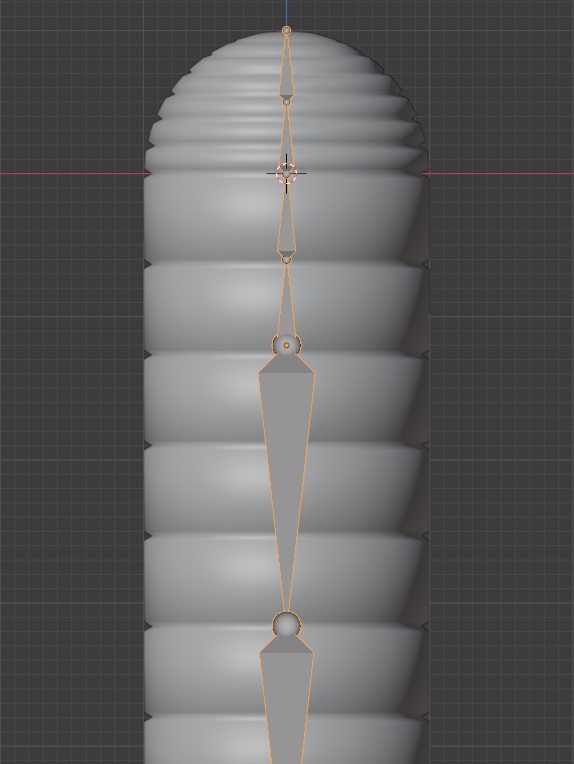
The length of the chain (number of joints) can be as short or long as you wish. For this example I am going to be applying the chain physics to a simple worm model I made (marvel at my skill). For my particular model, I have four bones directed upwards and nine bones directed downwards. The bottom bones will be trailing below where I eventually put the user's face and the top bones will be controlling the motion above the face. When parenting my model to the rig I just used an automatic weight calculation (the weight is how much each portion of the model will be controlled by each bone). You don't need all the bones in your rig to be connected in a line. Each portion that you want to wiggle can have its own set of bones. For my worm model the top and bottom portions are going to be controlled separately, they just so happen to still be connected. Once your model is rigged and ready to go, export it and then import it into Lens Studio.
Adding the scripts
So I have my 3D model attached to a head binding, and now I want to add some motion. Make sure you've already imported the three chain physics scripts that you exported from the template, add a Scene Object in the Objects Panel, drag it to the top if the object hierarchy, and then add the JSMathLibrary and PositionBasedDynamicsHelper scripts to it. You can also rename it (this is the equivalent of the Helper Scripts object from the template). Now add the ChainController script to your scene. I placed mine on the worm model I imported. We are almost ready to add the joints, but if you look in the Logger you'll see there is an error. Go to the JSMathLibrary script component (what you added to the Objects Panel, not the actual script file in the Resources Panel), check the "Settings" box, and then select "vec3" and "quat." That should prevent the error from popping back up again.

Add the physics
I'm going to start with the four top bones. If I go back to the ChainController script component that I added to my 3D model, there is an input called "Joints, values" with an "+ Add Value" button. I'm going to click that button, click inside the "Value 0" box that appears, and then select all the bones I want to participate in my first chain. You can hold down shift/ctrl to select multiple values, but the last value selected will end up first in the chain, so delete that input and then re-add it to the end of the list. Now that I've selected some joints, the top part of my worm is now hanging down inside the rest of the body. What I need to do now is adjust the Force input on the script. Right now for the "Y" value it is set to -1, so let's change that to 0.1 to give it a slight, upward lift. Now I can see the first chain bouncing around! Once I've adjusted the parameters to my liking, I do the same for the bottom chain. Here's an overview of the different parameters and what they do.
Stiffness
The stiffness parameter behaves much as you would expect it to. A low stiffness allows the joints to move around more freely, while a high stiffness restricts their motion a bit more.
Type
Here you can choose between Rigid and Elastic. If you select rigid, the spacing between the joints will remain constant, although with a low stiffness value you will still get some stretching. If you select elastic, the spacing between joints is more free to move and stretch.
Iterations
According to the official Lens Studio documentation for the template, the iterations parameter will control how quickly the joints return to their resting state. In practice I don't see huge differences when this parameter is changed unless I have elastic selected for the motion type. A higher iteration counts means more calculations need to be run, so I typically just keep this value at one.
Time Speed
This parameter is one of the more important ones. A low value means the joints will be moving around more before they come to rest, while a high value will move the joints to their resting state much faster. It is almost like controlling the stiffness; a high value will keep things more aligned while a low value will do the opposite.
Force
Force is another important parameter. If there is no force applied, then the joints will continue to swing around for a long, long time. Too high of a force can stretch things out, so depending on how you want your motion to look, a value of 0.1 (or -0.1 depending on the direction you want things to go) will usually be a good starting point.
Is Relative
This parameter will let you align the physics with another object. Let's use my worm as an example. If I have my Y-force set to 0.1, the head of the worm will always end up straight up and down after it stops moving. If I check the "Is Relative" box and then select my head binding, it will point up relative to my head. Unchecked the worm's head will point up to the top of the phone screen, and if I tilt my head, it will still point up to the top of the phone screen. If this option is checked then the worm's head will always point the direction my head is facing, even if I tilt my head. Play around with it a bit to get a feel for how this works.
Add Rotation
When this option is not enabled, the motion from the chain physics tends to be side-to-side and up-and-down. If you enable this option, then you will start to get some outward-and-back motion as well. I like to have this option enabled with 3D objects.
Add the face
If you were simply adding chain physics to some sort of element in the scene, you would probably be good to go at this point. However, since I want to turn the user into this worm, I still have a few steps left. I'm going to start by adding the user's eyes and mouth to the worm. This is easy enough with a few Face Insets. Just add a mouth, left eye, right eye, then position them, and voila!
Add the background
For my background, I am going to do the following:
- Create a new Render Target and name it "Background"
- Add a Screen Image (which will also create an Orthographic Camera)
- Change the render target on the Orthographic Camera to the new Background render target
- Set the Texture on the Screen Image to my image of choice and set the Stretch Mode to "Fill" (so it looks good on Snap Camera too)
- In the Scene Config drag the Orthographic Camera and Background render target above the original camera and Render Target (make sure the background is rendered first)
- Select the original camera, change the "Clear Color Option" to Texture, and then for the Input select the Background render target