Recreate the Clone Photos filter from TikTok using Lens Studio

The more the merrier. More is always better. These wise words of wisdom have been handed down for generations, and now you can bring them to pass inside Snapchat. Here in this tutorial you will learn how to exactly recreate my viral cloning lens. Just make sure you change it up a bit so we don't get caught ;) The key to this effect is the new full-body segmentation which was recently introduced in Lens Studio 3.4 along with a little scripting. You can see an example of this by clicking here or by scanning the snapcode below.
Overview
The concept of our clone lens is pretty simple - we want to be able to display the same person multiple times. We'll use segmentation to cutout the person, the copyFrame function to freeze their state at various times, and we'll have a simple UI at the beginning of the lens to let the user pick the number of clones they want to create.
The base UI
Let's start with the UI. Create a new render target and name it UI. In the scene config, set the Live Target to the UI render target. We want to let the user choose their number of clones, but it doesn't need to be displayed in the final Snap. Using a separate render target for the Live Target accomplishes this.
Now add some Screen Text. This will also create an orthographic camera. Select the camera and set its render target to the UI target, set it to a new layer (I named mine UI), set the Clear Color Option to Texture, then choose the original Render Target for the Input. Now select your screen text and place it on the UI layer. Now if you toggle between the Live Camera and Capture Mode in the preview panel, you should see the screen text disappear for Capture Mode.
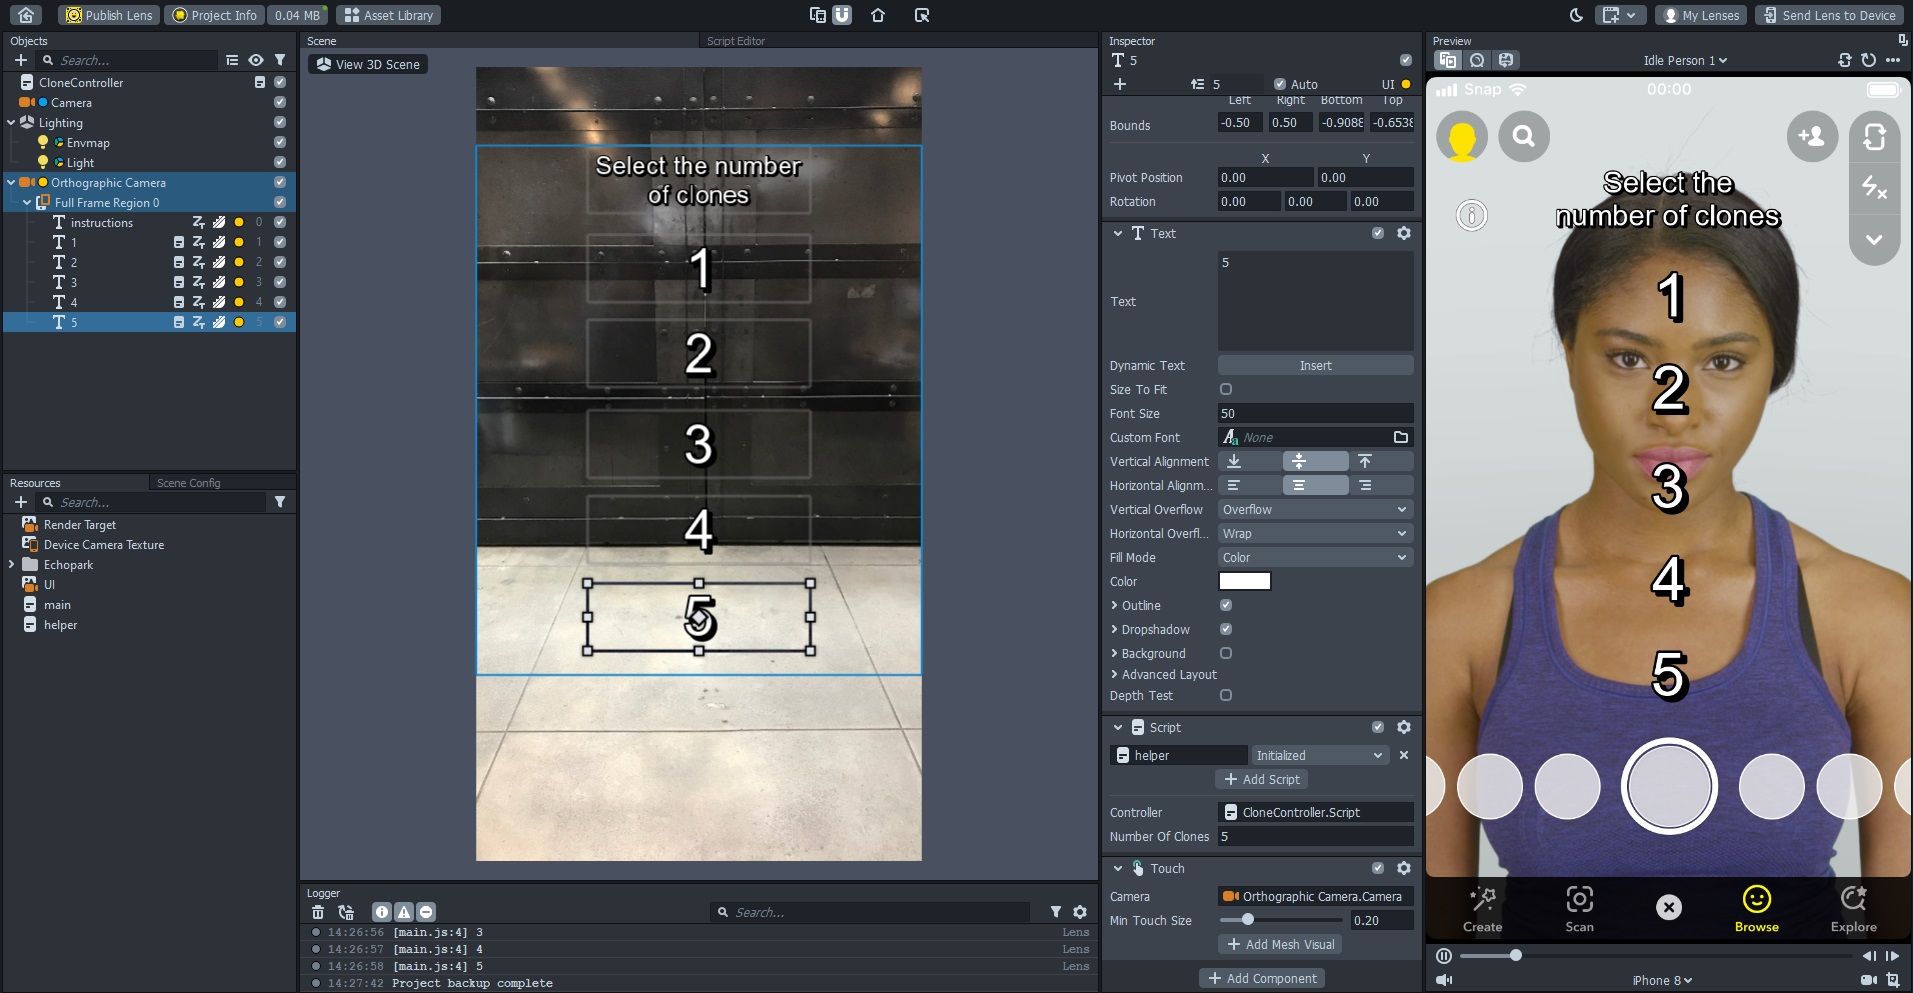
Now let's add our options. Select the Full Frame Region 0 and set the Screen Region to "Safe Render" in the inspector panel; we want to ensure our options are not covered by the Snapchat UI. Head back to the screen text and rename it to "instructions" or something similar. Put in your text and then style and position it.
On to the choices! Rather than create a new Screen Text object, I'm just going to copy the instructions so that I don't have to change the layers or anything. Ultimately I want to have five choices, the numbers 1-5, but for now just make a single copy. Move it down and change the text to read "1". Before we create the rest of the choices, we are going to take a pause and create a couple scripts first. Trust me, it will make our lives a little easier in a bit.
The base scripts
Our clone effect will need two scripts - one main script to create the clones and a helper script on our choices to trigger the effect. Let's start out by scaffolding out the main script.
Create a new script in the resources panel and then add it to the scene at the top of the object hierarchy. We are going to keep things simple to start and add only the following code to this script:
// -----JS CODE-----
function startCloning(num) {
print(num);
}
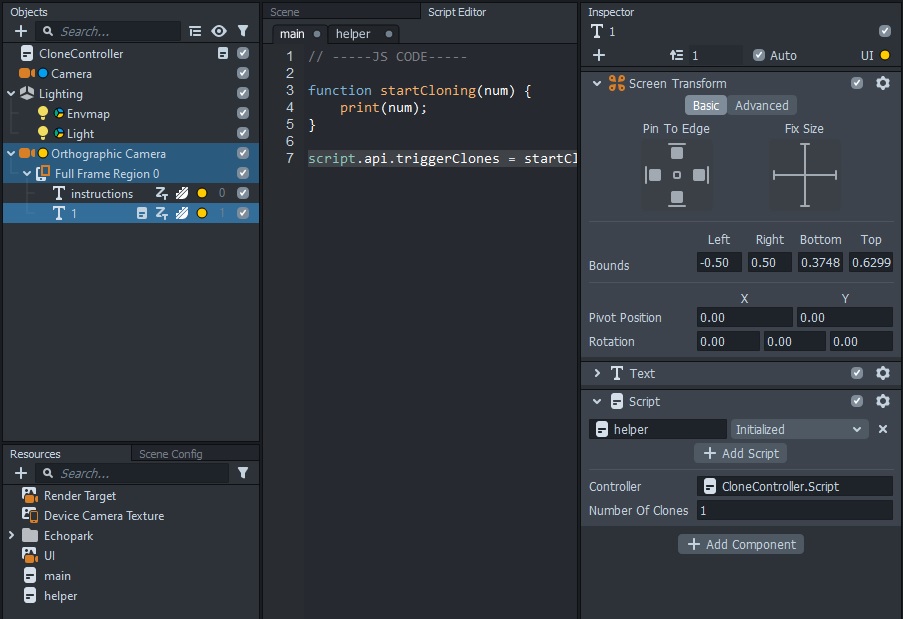
script.api.triggerClones = startCloning;The startCloning function will be what kicks off the process of creating our clones. The script.api.triggerClones portion can be thought of as Lens Studio's equivalent to module.exports. What this line does is it allows us import our script inside another script and call the startCloning function. Let's create our helper script for the option choices to see this in action.
Create a second script for our helper script and add the following code:
// -----JS CODE-----
// @input Component.ScriptComponent controller
// @input int numberOfClones

script.createEvent("TapEvent").bind(function () {
  script.controller.api.triggerClones(script.numberOfClones);
});
Here we import a script component and the number of clones we want. Then when there is a tap event, we call the triggerClones function of the imported script. In our case this will call the startCloning function with the number of clones we want. Scripting wise this is all we'll need for the helper script, so now add it to the screen text representing the first choice. For the number of clones I am going with "1" and for the controller input I am selecting my main script. If you now click in the preview window, you'll see the value you specified for the "Number Of Clones" input printed out in the logger panel. We've added quite a bit so far, but we still aren't quite ready for the cloning portion. But almost.
One issue you may have noticed is that our main script is printing out the number of clones regardless of where we tap on the screen. We want to make sure our function is only triggered when an answer choice is tapped. Add a Touch Component to the first answer choice, select the Orthographic Camera for the Camera input, and then set the Min Touch Size to something like 0.2. If that value is too small, the taps won't register. If it is too large, then tapping elsewhere on the screen can still trigger it. A value of 0.2 works well for me. Now if you click on the first choice, the number of clones should be printed in the logger. If you tap elsewhere, nothing will be printed out.
Now that we have our script and touch components added to our first choice, go ahead and duplicate it a few times. With each copy, you just need to change the text that is displayed along with the "Number Of Clones" input on the helper script.
A place for the clones
Now that we have our base UI and scripts created, it's almost time for the actual clones! We'll use our script to create the clones, but before we can do that we need a place to display the clones. Deselect everything in the objects panel (you can click in a blank space in the objects panel to do so) and add a new Screen Image. This should add a new orthographic camera as well. Alternatively you can add a new camera/screen image manually. I'm going to rename this camera to "Clone Cam" to help stay organized. I'll also drag it above the other orthographic camera (the one for the UI) and then make sure it is rendered before the UI render target in the scene config by dragging it up by the original camera. This helps me keep track of everything a little better.
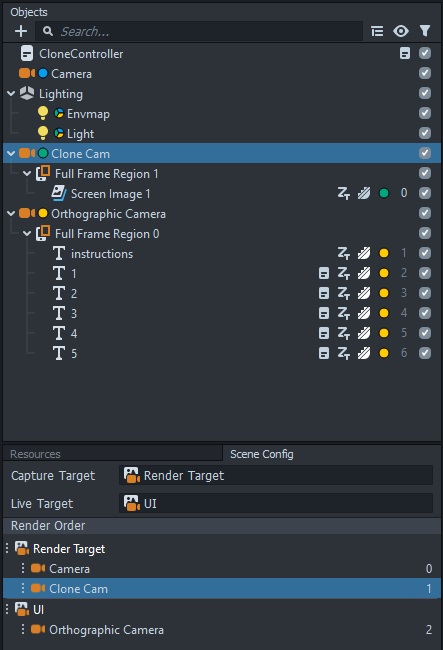
Make sure the Full Frame Region is set to "Full Frame," set your image stretch mode to "Stretch," and then rename the screen image to "1" or something. This will be where our first clone goes. Go ahead and copy that screen image so that you have enough for all the potential clones (in this case, we want five total). Then copy it once more and rename this one to "Overlay." The preview panel should now be covered by the placeholder images, but we'll take care of that soon.
To overlay each clone over the previous clone, we need to be able to add an opacity texture to our screen images. Lens Studio 3.4 now includes full body segmentation which is just what we need to do this, but we can't apply opacity textures to the default image materials. Not to worry, that is easily solved with the Unlit material. In the resources panel, add a Segmentation Texture -> Body and then create some Unlit materials, one for each of the screen images we just added (so six total and I'm naming the materials the same as the images). For each unlit material, change the Blend Mode to "Normal" and enable the Opacity Texture option, but skip enabling the opacity texture on the first material because we want to freeze the background with our first clone. Now that you have the materials made, apply the corresponding material to each screen image. For images 1-5, don't worry about selecting base and opacity textures. On the overlay image, go ahead and select the Device Camera Texture for the base texture and the body segmentation for the opacity texture. We will use our script to set the textures for the remaining materials.
Create the clones
Finally! Let's get cloning!
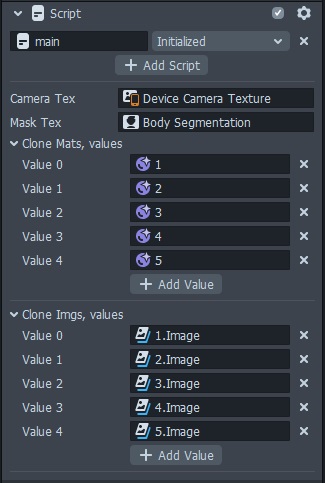
Head back to the main script (not the helper script we added to the UI choices) and add a few inputs at the beginning of the script. We need the texture to clone from, the segmentation mask, and then the images and materials we just created.
// @input Asset.Texture cameraTex
// @input Asset.Texture maskTex
// @input Asset.Material[] cloneMats
// @input Component.Image[] cloneImgs
Save your script then find it in the objects panel. Go ahead and select the inputs.
First we will use a loop to make sure all the screen images for the clones are disabled. We can manually disable them in the objects panel, but doing it in the script ensures they always start disabled (in case we forget to disable them manually). Next we are going to create a function we can call to create the clones. We are going to pass in which number clone we are on, freeze the camera texture and the segmentation texture, and apply those to the corresponding material and activate the screen image. Our script should now look like the following:
// -----JS CODE-----
// @input Asset.Texture cameraTex
// @input Asset.Texture maskTex
// @input Asset.Material[] cloneMats
// @input Component.Image[] cloneImgs

for (var i = 0; i < script.cloneImgs.length; i++) {
  script.cloneImgs[i].enabled = false;
}

function createClone(index) {
  print("Making clone " + index);
  script.cloneMats[index].mainPass.baseTex = script.cameraTex.copyFrame();
  script.cloneMats[index].mainPass.opacityTex = script.maskTex.copyFrame();
  script.cloneImgs[index].enabled = true;
}

function startCloning(num) {
  print(num);
}

script.api.triggerClones = startCloning;
Time to trigger the cloning! We want to create the clones at periodic intervals, so we are going to use a DelayedCallbackEvent to trigger the cloning. We'll also need a few extra variables to keep track of a few things.
delayTimewill be the time in seconds between clonescurrentIndexwill be how we keep track of which clone we are creatingcloneCountwill start at 0 but be set to however many clones the user chooses
Inside our delayed callback event, we'll create the clone, increment the current index, and then if we have not yet reached our desired clone count, we'll trigger the delayed callback event again. And in our startCloning function we'll be sure to set our clone count to the number we receive there from the UI helper script. Let's take a look at our code now:
// -----JS CODE-----
// @input Asset.Texture cameraTex
// @input Asset.Texture maskTex
// @input Asset.Material[] cloneMats
// @input Component.Image[] cloneImgs

var delayTime = 3;
var currentIndex = 0;
var cloneCount = 0;

for (var i = 0; i < script.cloneImgs.length; i++) {
  script.cloneImgs[i].enabled = false;
}

function createClone(index) {
  print("Making clone " + index);
  script.cloneMats[index].mainPass.baseTex = script.cameraTex.copyFrame();
  script.cloneMats[index].mainPass.opacityTex = script.maskTex.copyFrame();
  script.cloneImgs[index].enabled = true;
}

var delayedEvent = script.createEvent("DelayedCallbackEvent");
delayedEvent.bind(function () {
  createClone(currentIndex);

  currentIndex += 1;
  if (currentIndex < cloneCount) {
    delayedEvent.reset(delayTime);
  }
});

function startCloning(num) {
  print(num);
  cloneCount = num;
  delayedEvent.reset(delayTime);
}

script.api.triggerClones = startCloning;
When you select an option in the UI, you should see the cloning progress printed out in the logger. Keep in mind that JavaScript uses 0-based indexing so our first clone will actually be clone 0. Switch the preview panel over to your webcam and give the lens a try! You should be seeing your clones created, but let's polish the UI a little and add in the countdown.
Finishing the UI
We are going to start by adding in some screen text for the countdown. Select the UI orthographic camera and add a new Screen Text. This should create a new Full Frame region as well (it will be important in just a bit that we have a new full frame region). Rename the text to countdown, format it how you wish, move it to the UI layer, and leave the text value blank - we'll set the value with our script. Our text is already in the middle of the screen, but I set the full frame region to Safe Render just to be safe. Before heading back to our script, rename the full frame region with the instructions and the choices to something like "choices."
Jump back into the main script and add a couple more inputs - a Component.Text input for the countdown text and a SceneObject input for the "choices" full frame region. Save the script and select the appropriate objects for the new inputs.
Our first scripting change is simple. When we start cloning, we want to hide our initial list of options. Inside the startCloning function, just add script.choices.enabled = false, swapping out whichever name you used for that input. Once the number of clones is selected, the options will be hidden so the user can focus on the actual cloning process.
Our next change is a little larger, but nothing too crazy. We want to add in a new variable hasStarted to keep track of if we should start the countdown; it should be initialized to false. Next we'll create an UpdateEvent and use the remaining time on the delayed callback event to calculate how much time is left and display that to the user. Our script should now look like this:
// -----JS CODE-----
// @input Asset.Texture cameraTex
// @input Asset.Texture maskTex
// @input Asset.Material[] cloneMats
// @input Component.Image[] cloneImgs
// @input Component.Text countdownText
// @input SceneObject choices

var delayTime = 3;
var currentIndex = 0;
var cloneCount = 0;
var hasStarted = false;

for (var i = 0; i < script.cloneImgs.length; i++) {
  script.cloneImgs[i].enabled = false;
}

function createClone(index) {
  print("Making clone " + index);
  script.cloneMats[index].mainPass.baseTex = script.cameraTex.copyFrame();
  script.cloneMats[index].mainPass.opacityTex = script.maskTex.copyFrame();
  script.cloneImgs[index].enabled = true;
}

var delayedEvent = script.createEvent("DelayedCallbackEvent");
delayedEvent.bind(function () {
  createClone(currentIndex);

  currentIndex += 1;
  if (currentIndex < cloneCount) {
    delayedEvent.reset(delayTime);
  }
});

function startCloning(num) {
  print(num);
  hasStarted = true;
  script.choices.enabled = false;
  cloneCount = num;
  delayedEvent.reset(delayTime);
}

script.createEvent("UpdateEvent").bind(function () {
  if (hasStarted && currentIndex < cloneCount) {
    var timeRemaining = Math.floor(delayedEvent.getTimeLeft());
    var displayTime = delayTime - timeRemaining;
    script.countdownText.text = displayTime.toString();
  } else {
    script.countdownText.text = "";
  }
});

script.api.triggerClones = startCloning;
You would expect the getTimeLeft function to give us exactly what we need, but we actually have to subtract that value from whatever delay time we are using. Anyway, give your lens a try! You should now have a fully functioning clone lens! If you are happy with how everything looks, push the lens to your device to test it out (hint hint).
Time to fix a bug
If you pushed your lens to your device (which you always do before submitting, right?), you may have noticed that it crashes when creating the clones. The UI works and the countdown works, but once you get to the first clone it crashes. This sort of problem is super frustrating to troubleshoot because everything was working fine inside Lens Studio and Snapchat doesn't tell us what went wrong.
So how do we troubleshoot this? Well we know when the issue is occurring. We know that the issue is either occurring with our createClone function or when we reset the delayed callback event. The first countdown works, but then either creating the clone or triggering the second one does not.
Let's start by taking a look at our createClone function. The first thing we are going to try is commenting out the line where we set the baseTex. Make the change, save the script, and push to your device. Didn't work? Comment out the next line where we set the opacityTex, save, and push to device. Hooray! Our lens doesn't crash anymore! But why? Unfortunately, I don't have an exact answer. I did ask around a bit and Ben Knutson shared that for whatever reason, the copyFrame function does not work with segmentation textures. But that is kind of a problem for us. How do we solve it?
Fortunately the answer is simple. We are going to pipe the Body Segmentation texture to a separate render target.
- Create a new Render Target, name it "Mask" or something
- Create a new camera, name it "Mask Cam" or something
- Create a new layer and set the camera to just that layer
- Set the camera type to orthographic
- Set the camera's render target to the mask render target
- Go to the Scene Config and drag the mask render target to the top of the list so it is rendered first
- Add a screen image to the mask camera and make sure it is on the same layer as the camera
- Change the stretch mode of the image to "Stretch" (I don't like to take any chances) and choose the Body Segmentation texture for the image texture
- Select the clone controller script and select the mask render target for the mask texture input
- Make sure any changes you made to the control script while troubleshooting are reverted (uncomment anything you commented out).
That's a long list, but all we are doing is setting up a new camera/render target pair on a new layer, outputting our segmentation texture to that, and then using that render target as our mask texture. Once that is done, your lens is now complete and will work on your device. Give it a try!