Sample colors and skin tone with a Procedural Texture

Sometimes you need to know what color something is, whether it is the user's skin tone or some area of the screen. The Procedural Texture Provider in Lens Studio gives us access to pixel-by-pixel color information. You can see an example of this by clicking here or by scanning the snapcode below.
The procedural texture provider
Lens Studio has this really nifty feature called the Procedural Texture (let's call it "PT" from here on out). The PT is super cool because you can actually read and write pixel specific information. I don't think the PTs are efficient enough to be doing crazy effects with them (I may be wrong, I haven't tried it), but we can use PT to sample colors in specific regions. This means we can create color palettes from images or sample skin tones.
To sample skin tones, we are first going to create a script using a PT to visualize where we are sampling colors from and then create a second script to actually do the sampling. Please note that we are going to be spending quite a bit of time writing JavaScript in this tutorial.
Visualizing the sampling
Let's start by setting up our sampling visualization. Add a Screen Image to your scene and set the texture as a Face Crop Texture. Select the Face Crop Texture and change the Scale to something like 0.5 x 0.5 so we have a nice, zoomed-in look. None of this is required for the final lens, we are just going to use this to figure out our sampling areas.
Now create a new script and name it "mapper" then add it to your scene. Change the dropdown that says "Initialized" to "Frame Updated" so that the script runs on each frame. Then, copy and paste the following code and save your script. Let's go over what everything is doing.
// -----JS CODE-----
// @input Asset.Texture tex
// @input Component.Image image
// @input int sampleSize
// @input float x {"widget":"slider", "min":0, "max":1, "step":0.01}
// @input float y {"widget":"slider", "min":0, "max":1, "step":0.01}
var channels = 4;
function fillBlack(size) {
var data = new Uint8Array(size * size * channels);
for (var i = 0; i < data.length; i += 4) {
data[i] = 0;
data[i + 1] = 0;
data[i + 2] = 0;
data[i + 3] = 255;
}
return data;
}
function percentToPixel(p, l) {
return Math.floor(p * l);
}
var procTex = ProceduralTextureProvider.createFromTexture(script.tex);
var x = percentToPixel(script.x, script.tex.getWidth());
var y = percentToPixel(script.y, script.tex.getHeight());
var data = fillBlack(script.sampleSize);
procTex.control.setPixels(x, y, script.sampleSize, script.sampleSize, data);
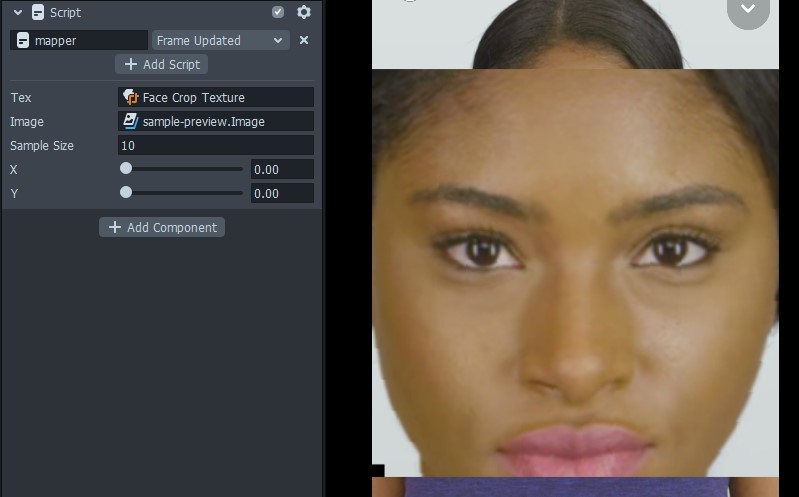
script.image.mainPass.baseTex = procTex;We start off by exposing a few parameters to select as script inputs. The texture asset will be the texture we are sampling pixels from and the image component will be where we are displaying our texture. The sample size input will be the width and height (in pixels) of our sampling area and the x and y inputs are the sampling coordinates (in percent) of where to sample. Select the face crop texture for the "tex" input, the screen image for the "image" input, then set the sample size to something like 10. You should now see a black box in the lower left-hand corner of the face crop image.
So how does this all work? Let's skip over the functions for now (we'll come back to them) and start at the line that starts with "var procTex." Here we use the ProceduralTextureProvider to create a new PT from our input texture.
Next up we are taking our x & y inputs and passing them into the percentToPixel function. Our input x and y are on a 0-1 scale, but the PT needs an actual pixel value. This function just multiplies our input percentage by the width or height of the PT.
Next up we are using the function fillBlack to set our data variable. Let's take a look at this function. We start off by creating a Uint8Array. A Uint8Array is a list of 8-bit unsigned integers. That's computer talk for a list of numbers that can go from 0-255 which is the same range as RGB pixel values (this is to save on the amount of memory needed to store the data). The size of this array is our sample size squared multiplied by the number of channels (4 in this case for RGBA). Let's take a quick breather to make sure we understand what is going on. Images are basically three dimensional sets of data. There is a width and height (two dimensions), but then at each pixel we have values for the red, green, blue, and alpha channels (the third dimension). The procedural texture provider only works in one dimension though, so this Uint8Array is what we need to use. We multiply the width times the height times the channels to get the total size of the array. In our case the width equals the height because we chose to sample a square area of pixels.
Next we are looping through our Uint8Array, but you'll notice we are skipping ahead 4 places at a time. That is because every four positions represents a single pixel. We set the red, green, and blue channels to 0 (to create the color black) and set the alpha channel to 255 (so the pixel is visible). Then we return the data array. All this function does is create a list of data points which are understood by the procedural texture provider to be a black square.
Now if we jump back to the rest of our code, we can see that we take our black pixel data and pass it to the setPixels function on our PT. We specify the x & y positions, how far to go in each direction, and the data we want to be used. In other words, we are taking our square of black pixels and sticking them in our texture. The last step is to set our procedural texture to the base texture of the image so that we can see it. If you play around with the X & Y sliders on the script, you'll see the square move around. If you set the values too high, the black square will disappear because it is trying to write pixel values that are outside the bounds of the image.
Doing the sampling
The code we just wrote shows us how to select a position on a texture, but it doesn't actually sample the colors. Let's now create a new script to do the sampling. Once you've created your script, add it to the scene and set it to "Frame Updated" just like the mapping script.
For our script inputs, we need to input a texture to sample from, and let's add an image component too so that we can visualize the output of our sampling (you can always remove this part in your final lens). Now, we could specify some inputs for the x and y sampling locations along with the sample size (like we did with the mapping one), but I'm instead going to accept an array of values so that we can sample from many locations. You don't need to do it this way, but in this example I want to sample the face color so I'm going to sample from several different parts of the face.
// -----JS CODE-----
// @input Asset.Texture tex
// @input Component.Image image

// @input int[] sampleSize
// @input float[] x
// @input float[] y
Go ahead and select the face crop texture for the tex input, create a new screen image and use that for the image input (also create an Unlit material and set the screen image's material to that), then for now leave the sample size, x, and y inputs blank.
Next I'm going to copy a little bit of the mapping script - the channels assignment, the percentToPixel function, and the creation of the procedural texture. Then I'm going to create a new doSampling function and add a check to make sure we have x, y, and size values before sampling our texture.
var channels = 4;
function percentToPixel(p, l) {
return Math.floor(p * l);
}
var procTex = ProceduralTextureProvider.createFromTexture(script.tex);
function doSampling() {}
if (
script.sampleSize.length > 0 &&
script.sampleSize.length === script.x.length &&
script.sampleSize.length === script.y.length
) {
doSampling();
} else {
print(
"Make sure you have at least one sampling area set and that you have specified sample size, x, and y"
);
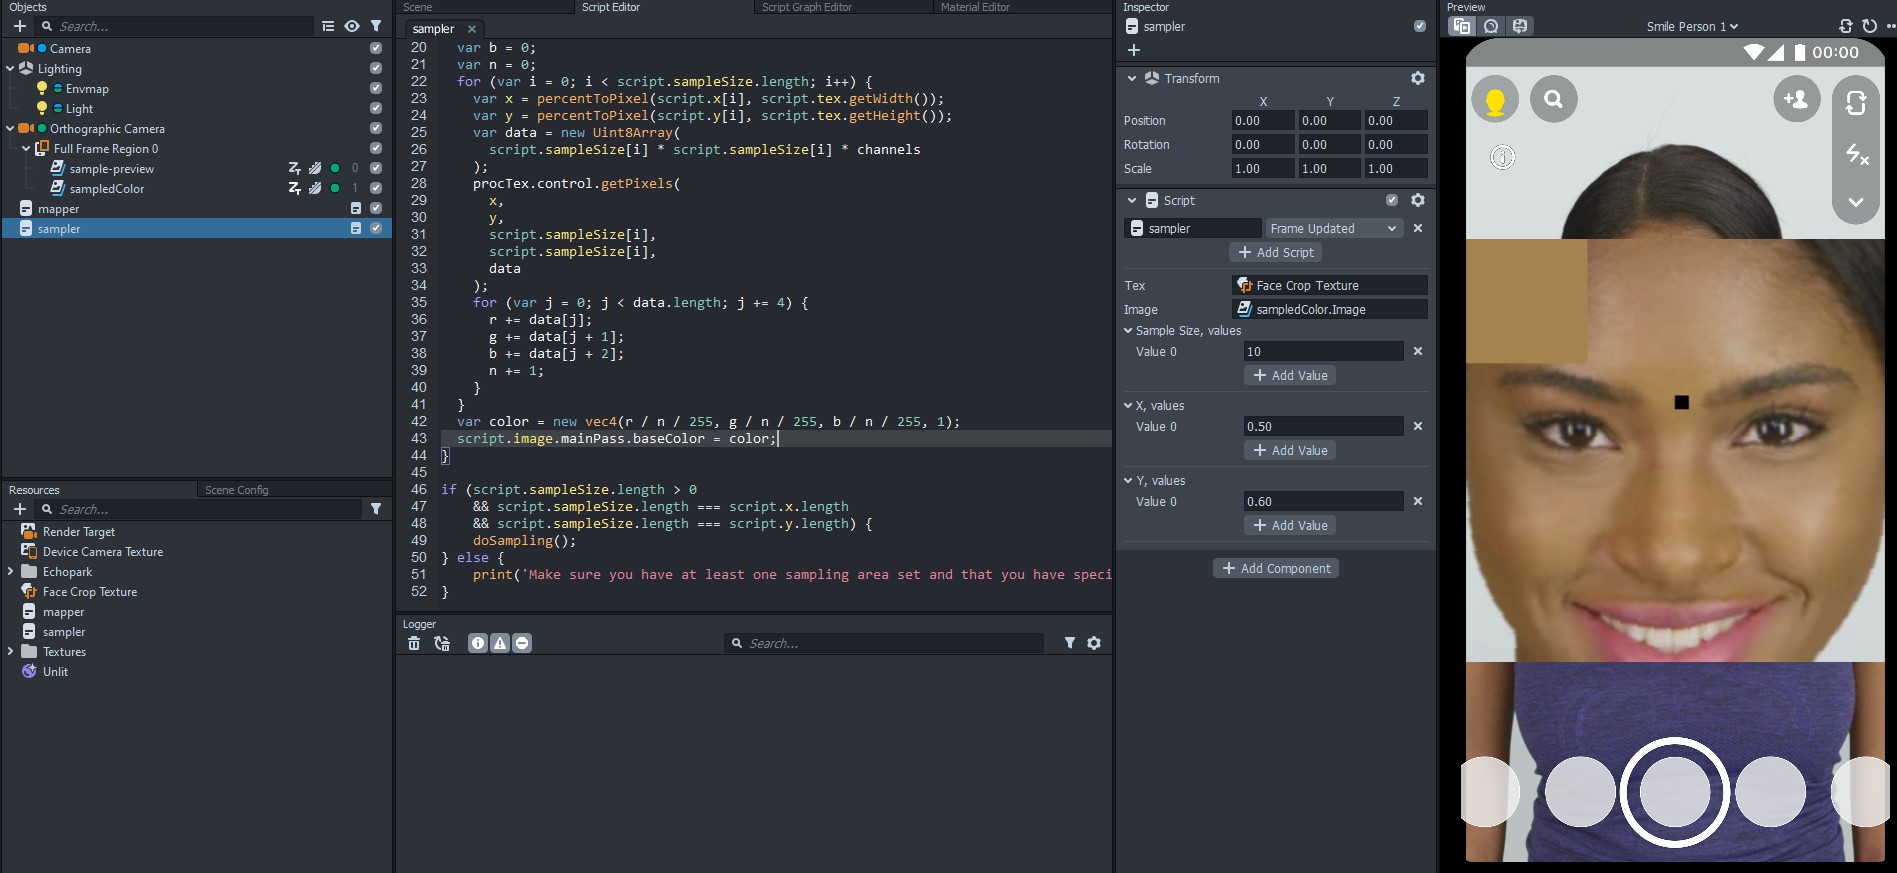
}For our doSampling function, we want to loop through each sampling area, extract the pixel values, then average them together to get our sampled color. It's nothing groundbreaking, so let's get straight to the code.
function doSampling() {
  var r = 0;
  var g = 0;
  var b = 0;
  var n = 0;
  for (var i = 0; i < script.sampleSize.length; i++) {
    var x = percentToPixel(script.x[i], script.tex.getWidth());
    var y = percentToPixel(script.y[i], script.tex.getHeight());
    var data = new Uint8Array(
      script.sampleSize[i] * script.sampleSize[i] * channels
    );
    procTex.control.getPixels(
      x,
      y,
      script.sampleSize[i],
      script.sampleSize[i],
      data
    );
    for (var j = 0; j < data.length; j += 4) {
      r += data[j];
      g += data[j + 1];
      b += data[j + 2];
      n += 1;
    }
  }
  var color = new vec4(r / n / 255, g / n / 255, b / n / 255, 1);
  script.image.mainPass.baseColor = color;
}
The key difference here is that instead of setting the pixels to a color, we are instead getting the pixels. The rest is just looping through everything and calculating an average color. Then at the end we set the color of our image to the sampled color.
Now, you'll notice that our screen image is still showing as plain white, and that is because we need to choose some sampling areas. Use the mapper script to find some areas of the face you want to sample, then on the sampling script add an entry each to the x, y, and size inputs. It is very important to note that you need to have the same number of entries for the Sample Size, X, and Y inputs. The first entries in each list go together, the second entries, etc. You can use the mapping script to choose a few different areas of the face to sample and then average all of those together by creating those multiple entries on the sampler script. Be sure to select a few different regions of the face, and keep in mind some users will be wearing glasses or have facial hair. Also be mindful of areas in light and shadow - if you don't have a good variety of sampling locations, you can skew too light or too dark. Of course we aren't going for an exact skin tone, but something pretty close.
Setting the color of a screen image is pretty boring, but you can add a MaterialMeshVisual component input to the script and set the base color of virtually anything you want! You can customize the script to accept material inputs instead too. Here is our final script with a material mesh visual input.
// -----JS CODE-----
// @input Asset.Texture tex
// @input Component.Image image
// @input Component.MaterialMeshVisual recipient

// @input int[] sampleSize
// @input float[] x
// @input float[] y

var channels = 4;

function percentToPixel(p, l) {
  return Math.floor(p * l);
}

var procTex = ProceduralTextureProvider.createFromTexture(script.tex);

function doSampling() {
  var r = 0;
  var g = 0;
  var b = 0;
  var n = 0;
  for (var i = 0; i < script.sampleSize.length; i++) {
    var x = percentToPixel(script.x[i], script.tex.getWidth());
    var y = percentToPixel(script.y[i], script.tex.getHeight());
    var data = new Uint8Array(
      script.sampleSize[i] * script.sampleSize[i] * channels
    );
    procTex.control.getPixels(
      x,
      y,
      script.sampleSize[i],
      script.sampleSize[i],
      data
    );
    for (var j = 0; j < data.length; j += 4) {
      r += data[j];
      g += data[j + 1];
      b += data[j + 2];
      n += 1;
    }
  }
  var color = new vec4(r / n / 255, g / n / 255, b / n / 255, 1);
  script.image.mainPass.baseColor = color;
  script.recipient.mainPass.baseColor = color;
}

if (
  script.sampleSize.length > 0 &&
  script.sampleSize.length === script.x.length &&
  script.sampleSize.length === script.y.length
) {
  doSampling();
} else {
  print(
    "Make sure you have at least one sampling area set and that you have specified sample size, x, and y"
  );
}