Add a dancing character in the sky

Do you want to make your own "Shrek in the Sky" style filter? If so, you've come to the right place!
Character setup
To place our character in the world we need to use the World Object Controller script. Don't worry, you don't need to write any code - we just have to import it in the Objects Panel from the "Helper Scripts."
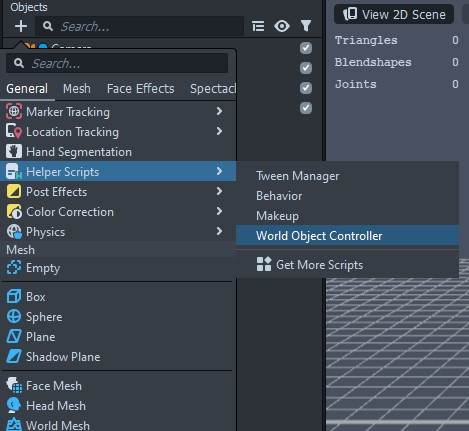
You'll notice that the World Object Controller script includes an animated Red Panda. Feel free to replace this with your own 3D character, but for the purposes of this tutorial I am going to go ahead and use the example character.
At this point we'll want to change our preview scene. Flip the camera in the Preview Panel and choose the "Beach" preview scene. You'll notice that the panda is locked to the camera and not tracking to the ground. Select the scene Camera, then in the Inspector Panel click on "+ Add Component" and find the "Device Tracking" component. You'll want to keep the tracking mode on "Surface" and you can enable the native AR option if you want, though it isn't required. Your character should now be tracked to the ground, but we are also going to select the WorldObjectController in the Objects Panel and then specify the Device Tracking component for the script in the Inspector Panel.
As a last step you can either disable the "Matte Shadow" object or scale it up to something pretty big like 3,000. Generally with 3D character lenses you want a shadow to help connect your character to the scene, but since we are placing the character in the sky it can be hit or miss. Feel free to turn the shadows on/off to get something you like. If you are using your lens in a flat field the shadows might look really good. If there are buildings, however, the shadow might make everything look flat.
If you don't see any shadows, select the "Light" object, make sure the light type is directional, then enable the "Shadows" option. The rotation of the directional light will dictate the direction of the shadows. If you imported your own 3D character, select the mesh objects in the Objects Panel and make sure the shadow mode is set to "Caster."
Placing our character
The astute reader may notice that our 3D character is not positioned correctly to appear in the sky. Select the character - be sure to select the 3D character and not the WorldObjectController - and change the scale. For the panda I used a value of 10. Now we also want to move our character back, so set the Z position to something like -5,000.
Your character should now be gone. Why is that? That's because the camera is only configured to show things less than 1,000 units away. Select the camera and change the "Far" value to something like 50,000 - just make sure it is a larger value than the distance you moved your character.
Adding sky segmentation
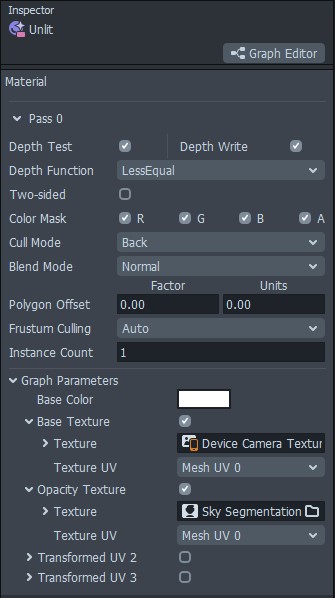
So far we have a giant 3D character, but ultimately we want them only visible in the sky. Start by adding the Sky segmentation texture in the resources panel and also create an Unlit material. Select the material and change the blend mode to "Normal," set the base texture to the device camera texture, and set the opacity texture to the sky segmentation texture.
Now head back to the Objects Panel and create a Screen Image. Swap out the material on the image for the Unlit material we just modified. I also like to set the stretch mode to "Stretch." You probably won't see anything change in the Preview Panel, and that is because the sky segmentation texture needs to be inverted. Select that texture in the Resources Panel and then enable the "Invert Mask" option and your character will now appear only in the sky!
Last steps
At this point the lens is complete, but if you want to add something like a post effect I recommend you add a new camera and add your post effect in there. You can't add it to the original camera because of the segmentation.