Add a sharpening or "alt" effect to your Snapchat lenses

You can buy the finished post effect here
In this tutorial we'll go over how to create a sharpening effect in Lens Studio (sometimes called "alt" by the cool kids). When used subtly it sharpens the image, and when used prominently you achieve a more HDR look to your lens. You can preview this effect by clicking here or by scanning the snapcode below.

Setting up the scene
The inspiration for this effect comes from an article on creating a face smoothing effect, but instead of smoothing out the details we are going to enhance them.
For this tutorial we are going to start with a blank project. In the Resources Panel add a Graph Empty Material and in the Objects Panel add a Color Correction Post Effect. Select the post effect and then in the Inspector Panel change the material to the Graph Empty material that you just added. At this point the lens preview should be solid white. Open up the Graph Empty material in the material editor and we are ready to get started.
Creating the sharpen effect
Adding the blur
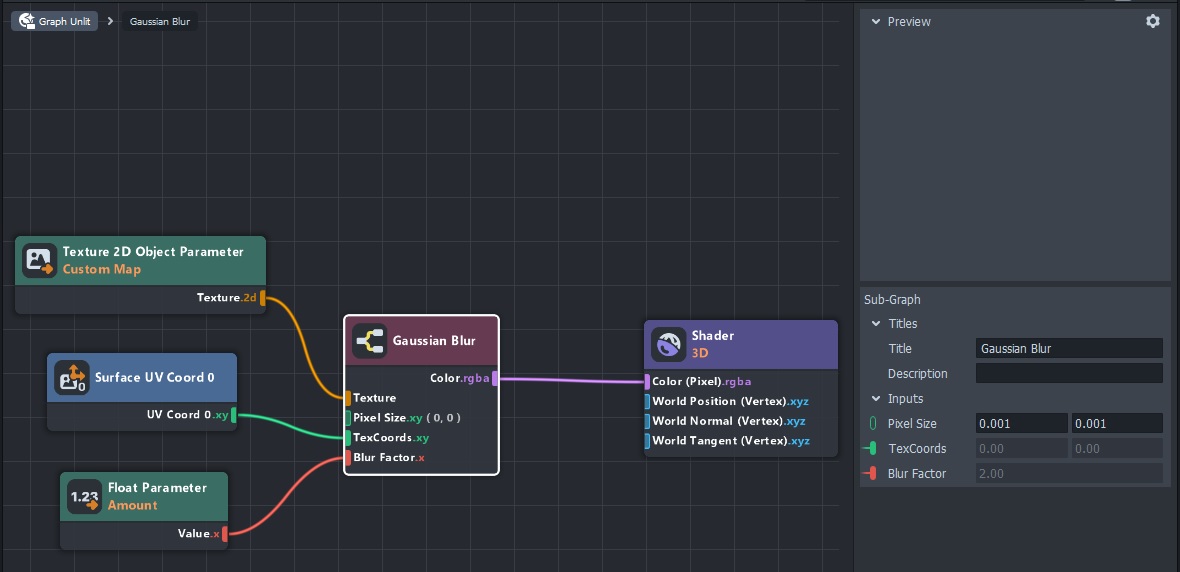
The first thing we need to do is blur the image. Add a Texture 2D Obect Parameter node, a Surface UV Coord 0 node, and a Gaussian Blur node. The Texture 2D object parameter node lets us select an input image for the effect. Connect the output of the Texture 2D Object Parameter to the Texture input on the Gaussian Blur node and connect the Surface UV Coord 0 to the TexCoords input of the Gaussian Blur. Select the Gaussian Blur node and set the Pixel Size input to something like 0.001 for both values. Next connect the output of the Gaussian Blur node to the Color input of the Shader node. If you select the Graph Empty material in the Resources Panel, you should see a texture input slot in the Inspector panel. Set the input texture to be a Screen Texture (the Screen Texture should have been added inside a Textures folder when you added the post effect, otherwise you can add it yourself in the Resources Panel). At this point you should be able to set the Blur Factor on the Gaussian Blur node and see a blurry image in the Lens Preview. You can add a Float Parameter node and connect it to the Blur Factor input which will let you control that value from the material's Inspector Panel.
Finishing it up
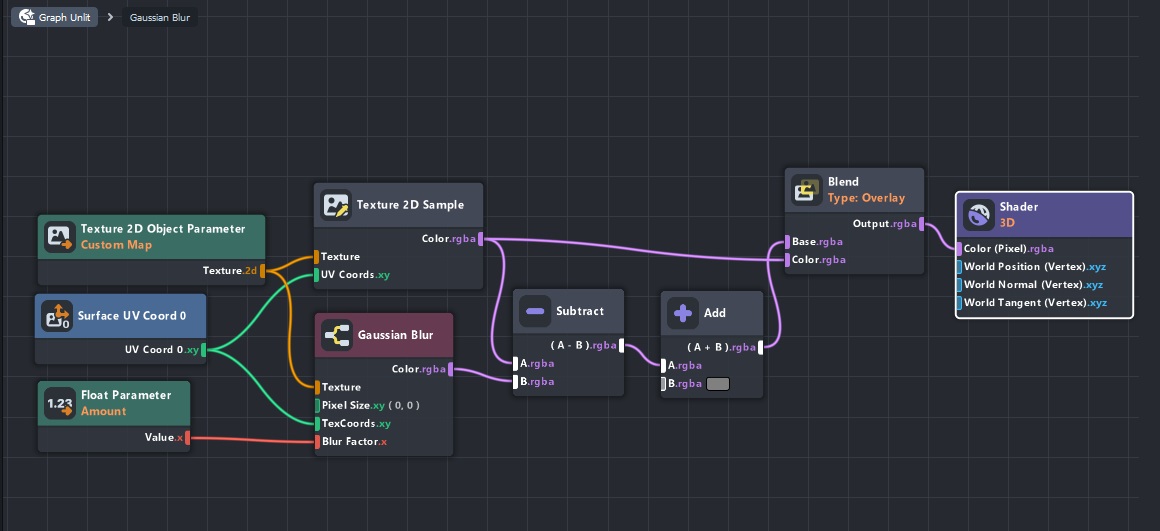
Now add Texture 2D Sample, Subtract, Add, and Blend nodes. The first thing we are going to do is subtract our blurred image from the original. Connect the output of the Gaussian Blur to the bottom input of the Subtract. Our original image in the Texture 2D Object Parameter node can't directly be connected to the Subtract node, so connect it to the Texture 2D Sample node along with the Surface UV Coord 0 node. Now connect that output to the top input of the Subtract node. Connect the output of the Subtract node to the top input of the Add node and select neutral gray as the bottom input. Neutral gray has RGB values of 128, 128, 128. If you were to connect the output of the Add node to the Shader node, you would see a mostly gray image with the fine detail of the original image. Take this gray version and connect it to the top Base input of the Blend node. Connect the output of the Texture 2D Sample to the bottom input and set the blend mode to Overlay. Finally, connect the output of the Blend node to the Shader node and the effect is complete!
Final thoughts
This sharpen effect is fairly simple to create and add to your lens. Because we added it as a Post Effect, anything you've added to your scene (images, 3D objects, etc.) will be included in the sharpening effect, provided they are above the Post Effect in the Objects Panel (just make sure the post effect is below everything you want sharpened, but not nested inside them). Due to how the Gaussian Blur node works, you'll start to get banding and ghost images if you increase the blur amount too much. If you stick with values of 0.001 for the Pixel Size on the Gaussian Blur node, you should be fine as long as you stay under a Blur Factor of 4.0.
Pro tip: If you start with the "Gauss Blur" post effect and modify that instead of creating the blur from scratch, you can avoid the artifacts you get with high blur strengths.