Create an adjustable background blur/bokeh effect with Lens Studio

In this Lens Studio tutorial we'll go over how to add an adjustable background blur (or "bokeh" as it is sometimes called, although it technically isn't bokeh in our case) to a lens. We'll go over how to apply the blur to just the background, add a slider to let the user adjust the strength of the blur, as well as how you can layer post effects on top of the completed lens. You can see an example of this type of effect by clicking here or by scanning the snapcode below.

Blurring the background
Adding the blur
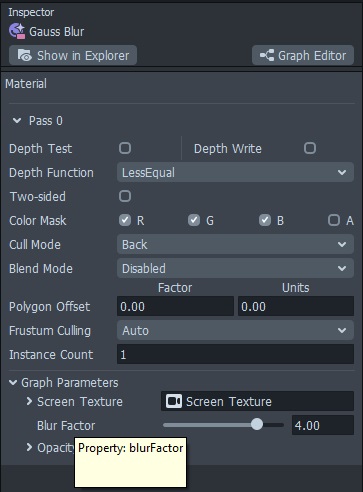
Blurring the background might actually be the easiest part of this lens. Start off by adding a "Gauss Blur" Post Effect in the Objects Panel. This will make the preview blurry (hooray!) and add a Gauss Blur material to the Resources Panel. If you select this material you can adjust the "Blur Factor" in the Inspector Panel to make the preview more or less blurry.
Blurring only the background
So far we have a blur going on, but our subject is also blurry. Add a Screen Image in the Objects panel and a Portrait Background Segmentation Texture in the Resources Panel. Now at this point we could set the texture of the screen image to be the Device Camera Texture and then mask the camera with the segmentation, but that would cause issues if we want to add something like grain or some other overlay to our lens. Instead, we are going to apply the segmentation only to the screen image.
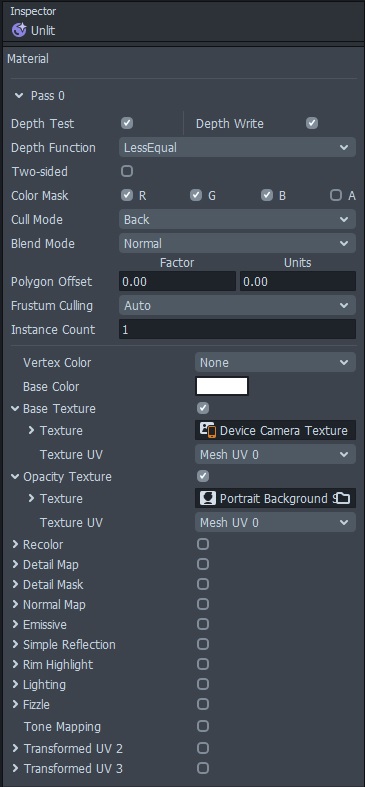
To do this, start by creating a new Unlit material. Select the material and set the Device Camera Texture as the Base Texture. Now enable the Opacity Texture option. If there is not an option to select a texture, change the Blend Mode of the material to Normal. Then select the segmentation texture for the opacity texture.
Now select the screen image and set the material to be our unlit material we just finished setting up. The default Stretch Mode of Fit should be fine, but I like to change mine to Stretch just to be safe and make sure the image fills the screen. You may notice that ther person is blurry now instead of the background, so select the Portrait Background Segmentation in the Resources Panel and select the "Invert Mask" option in the Inspector Panel. Now you should be golden! Since the default preview videos have a plain background, I recommend you push the lens to your device so you can really see it in action.
The user interface components
So we have a blurry background, but how blurry should it be? Very blurry, somewhat blurry, or hardly blurry? Instead of guessing, why don't we add some controls and let the user decide!
Instead of reinventing the wheel, let's use the Lens Studio User Interface (UI) system that they've kindly created! Just underneath the Overview section there will be a link to download it. Go ahead and download the zip file and then unzip it. Now from inside Lens Studio, import the UI_Widgets.lso file you just unzipped. This should add a "UI" folder of goodies in the Resources Panel and you should see something that says "[Place Under Orthographic Camera]" in the Objects Panel, but don't do anything with it just yet.
Creating a UI render target
While we want the user to be able to see and use the slider, we don't want it to appear in the final effect. Fortunately Lens Studio let's us use separate render targets for the live view and for what actually gets captured.
- Create a new render target in the Resources Panel and give it a good name, "UI Target" or something
- Create a new camera in the Objects Panel
- Rename it to something like "UI Cam" to keep things organized
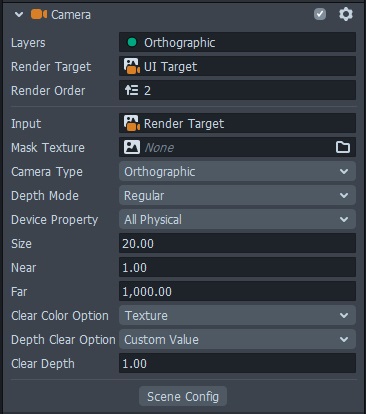
- Change the Layers to only Orthographic
- Change the Render Target to the new UI Target you just created
- Change the Camera Type to Orthographic
- Set the Clear Color Option to "Texture" and then set the Input texture to the Render Target (not the UI render target, the original render target)
- Go into the Scene Config Panel (by default this is a tab right next to the Resources Panel) and change the Live Target to the UI Target
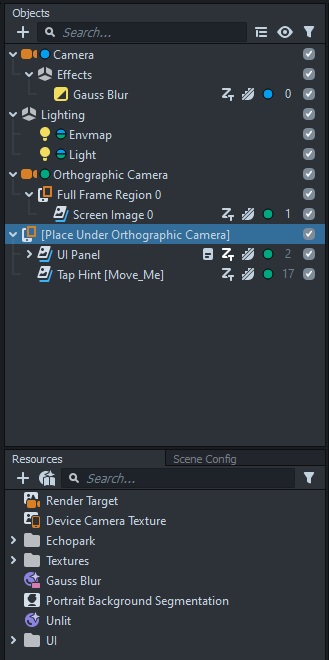
Okay, that was a lot, and while doing all that you may have noticed some buttons and sliders show up on the screen. So what we did was create a new camera to hold our UI. We made sure it was the right camera type (Orthographic) and for the camera input choose our Render Target (which is our final effect). Now go ahead and grab that "[Place Under Orthographic Camera]" object and attach it to the UI camera. Now there should be a slider on the left and some buttons in the middle.
Tweaking the user interface
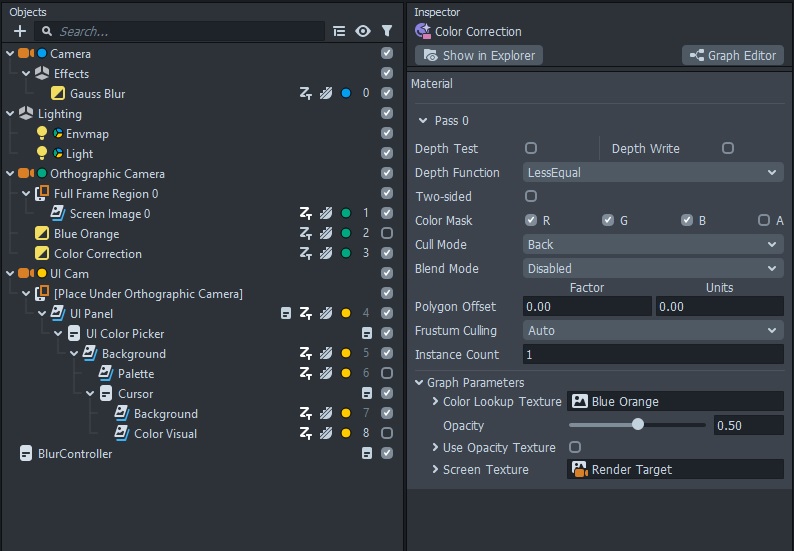
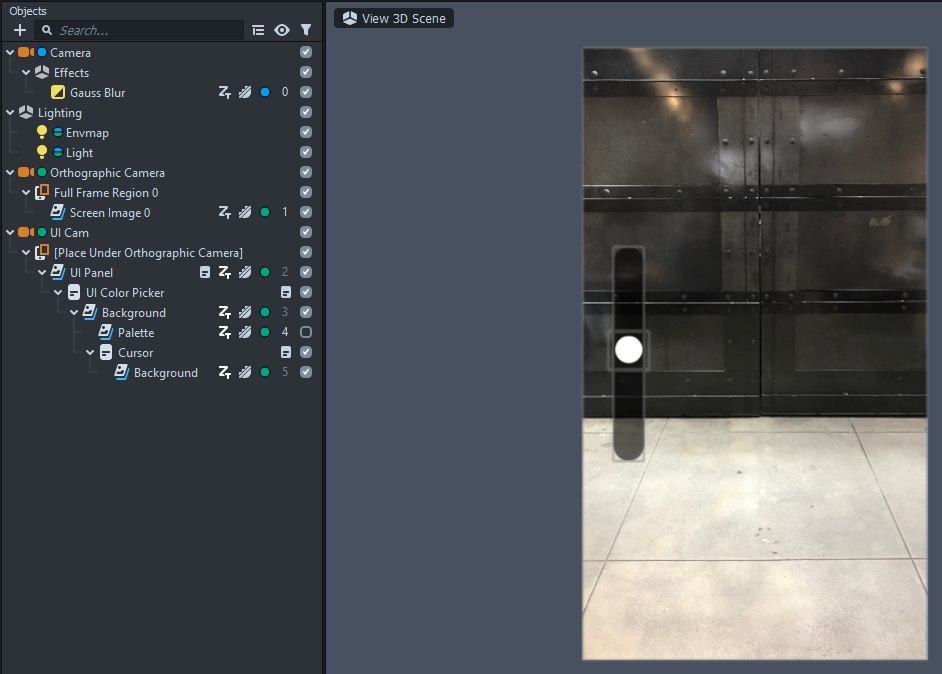
We want to adjust the strength of the blur, so the only UI widget that we need is the slider. If you expand the "UI Panel" object you can find all the various buttons and whatnot. You can delete everything in there EXCEPT for the "UI Color Picker" (you can leave the hint if you want).
We also want to get rid of the color scale from the slider because we are adjusting blur strength, not color. Let's expand everything inside that UI Color Picker and see what we have; take a moment to look around and see how it's all structured. One thing we won't need is the UI Popup. The UI Popup appears when the slider is being dragged and displays the current color off to the side. We won't need that, so you can disable or delete it. We also don't need the color displayed on the cursor. If you expand the Cursor object, you'll see a Background and a Color Visual object. You can disable or delete the Color Visual. The last thing we need to remove is the color scale. However, if we disable the Palette object, you'll notice that the cursor disappears too. Drag the Cursor outside of the Palette object and parent it to the Background object. Now you can disable the Palette object. Don't delete it because it seems to mess with the UI scripts and the cursor no longer slides, but go ahead and disable it. This will result in a partially transparent black background for the slider with a white circle for the cursor. Feel free to swap out those textures with whatever you wish if you want to customize the look of your slider.
Connecting the slider to the blur
Now we just need to get the slider information into our blur material. If we go back to the UI widgets page and scroll down, we can find some more information about the color picker slider. Fortunately the Lens Studio team thought this through and created a callback named "onSliderValueChanged" that we can use. If you aren't familiar with a callback, we are telling the script to notify us of any changes. It is like if you call your friend and tell them that you are running late but that you'll let them know if anything changes. If you don't call back, your friend can assume nothing has changed. But if you are now going to miss the party, you call your friend back (hence the name) and let them know. So anytime there is a change to the slider, it will trigger the callback.
Before you stress about writing a script, most of our work is already done because at the bottom of the slider section there is an example script using a callback. In this case it is changing the color of a material, so we just need to modify it to change our blur strength. The Lens Studio example is below:
// Script taken from https://lensstudio.snapchat.com/guides/scripting/helper-scripts/user-interface/

//@input Component.ScriptComponent colorPickerScript
//@input Component.MeshVisual targetVisual
// Set the target Mesh Visual's base color to the newly selected color
function changeColor(newColor) {
  script.targetVisual.mainPass.baseColor = newColor;
}
script.colorPickerScript.api.addCallback("onColorChanged", changeColor);
// Change the selected color to the color at the bottom of the palette
script.colorPickerScript.api.setSliderValue(0);
Now that we've seen how the Lens Studio team constructed their script, let's create ours. Before we start coding, let's talk through what we need to do. We need to listen to the "onSliderValueChanged" callback and set the blur strength of our Gauss Blur material. Other things that will help us are:
- An input to set a multiplier. The slider gives values between 0-1, but our blur strength can be higher than one. We'll just multiply our values by this number to go from 0-1 to something like 0-4 or 0-5.
- An initial value for the blur. We want to be consistent, so let's add an input for initializing the amount of blur in our lens.
With that in mind, here is the finished script:
// -----JS CODE-----
// @input Component.ScriptComponent colorPickerScript
// @input Asset.Material blurMat
// @input float multiplier
// @input float initialVal

function changeBlur(value) {
  script.blurMat.mainPass.blurFactor = script.multiplier * value;
}

script.colorPickerScript.api.addCallback("onSliderValueChanged", changeBlur);
script.colorPickerScript.api.setSliderValue(script.initialVal);
changeBlur(script.initialVal);
How does this work? For our inputs we take the color picker script, our blur material, and a few float values. The changeBlur function takes our slider value and multiplies it by our multiplier to set the blur strength. But what is that script.blurMat.mainPass.blurFactor nonsense going on? The first part is straightforward, script.blurMat is how we access the material we specified in our script inputs. The mainPass part is how we access properties of the material, but where does blurFactor come from? The Blur Factor is a configurable input for the material, and if you take a look at the material in the Inspector Panel and hover your mouse over a parameter, you can see the Property name which is how you access that value from a script.
The next portion of our script attaches our changeBlur function to the callback. This is just telling the color picker script that whenever the slider value changes that the specified function needs to be run. After that we position our slider at the initial value and make sure to set our blur to the same value.
Create a script in the Resources Panel, add it to the scene (make sure it is below the UI Color Picker object because that script has to be initialized before ours), set the inputs, and give it a whirl! You should now be able to control the amount of background blur with the slider!
Finishing touches
Now that the background blur is working, your lens just requires your finishing touches. Feel free to swap out the textures for the slider background and cursor. If you want to add grain or any sort of overlay, make sure it is placed under the first Orthographic camera and not the UI camera. If you want to use a Post Effect, place it after the Orthographic camera (but before the UI camera) and change the layer to Orthographic. This will apply the post effect to the entire lens without affecting the UI.
With the current setup the post effect might only be visible on the live target but not the capture target. You may need to place the UI camera (and all the elements underneath it) on a new layer. I go over this step in more detail in the video version of the tutorial.