Multiple post effects in your Snapchat Lenses

Lens Studio does a really good job of setting things up behind the scenes so that you can focus on your lens. However, some effects will require you to manually create and adjust cameras, layers, and render targets. You can see an example lens using multiple, distinct post effects by clicking here or by scanning the snapcode below.
Introduction
Lens Studio does a really good job of setting things up behind the scenes so that you can focus on your lens. However, some effects will require you to manually create and adjust cameras, layers, and render targets. If you want to use two different color corrections or have two distinct sets of effects, the best way to do this is with multiple render targets.
WTF are cameras, layers, and render targets?
As you've created lenses, you've probably noticed that each lens always starts with a camera. If you add 2D overlays like grain, then Lens Studio adds an orthographic camera for you. Usually that is all you need and you never need to worry about camera, layers, or render targets. But if you want to include multiple, separate post effects, we'll need to dive in a little deeper.
You can think of a camera as an information collector, layers as the information being collected, and render targets as the recipients of the information. Every object in your scene is assigned to a layer. 3D objects are automatically assigned to the "Default" layer and 2D elements are assigned to the "Orthographic" layer. But you can also create your own layers and assign each element to whichever layer you want. Each camera can be assigned to look at one or more layers. This is all handled automatically, but you can customize it. The camera that every project starts with is looking at the Default layer and the orthographic camera looks at the orthographic layer. The camera look at their layers, figure out how to draw the scene, and then output all that information to a render target. Again, this is all setup automatically when you create a new project, but you can create multiple render targets and assign different cameras to output to different render targets.
Scene setup overview
The nice thing about render targets is that they are image textures. This means that you can take a render target and display it as a screen image. This means that for each effect we can create a camera, a layer, and a corresponding render target. Then, we'll create a final camera to put everything together. This allows us to keep our multiple effects completely separate while we are creating them, but then combine them for the final lens. Let's walk through exactly how to do that.
Setting up the effect cameras
Before we get started, I want you to keep in mind that Lens Studio will often add new post effects and color corrections to the default camera and default layer. Every time you add something new to the scene, you will need to check which camera it is added to and double check the layer.
For the effect I am going to be building here, I want to have a slightly blurry, black and white background with a smaller view of the camera overlayed over the top with a color correction. To do this I will need a total of three cameras - one for the blurry, B&W background, one for the color correction for the overlay, and one to combine the two effects together. Each camera will also have its own layer and render target.
Let's start with the blurry B&W effect first. Start out in the Resources Panel by creating a new Render Target and naming it "BW." Then head up to the Objects Panel, create a new camera, and name it "BW Cam." Over in the Inspector Panel, click on the render target box and change that to the BW render target you just created. Then click on the Layers box, add a new layer, rename it to "BW Layer," click on it to select it, and then deselect the Default Layer. You can also click the little colored circle to change the label color for the layer.
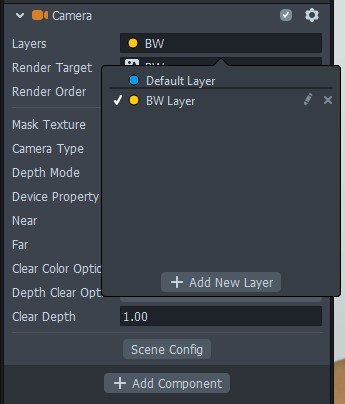
Now that we have our new camera and layer, let's start adding some post effects! I'm going to add the "Gauss Blur" post effect and the "BW" color correction. You should see the two effects working in the Preview Panel, but if you look in the Objects Panel you'll see that both effects were added to the original camera! Drag the "Effects" scene object to the BW Cam and then select each post effect and change the layer in the Inspector Panel.

After you change the post effect layers, you'll notice that our effect is no longer visible in the Preview Panel! This is what we want, but it makes it hard to adjust our effect! In the Resources Panel, there is a tab called "Scene Config" - head over to that tab. Here you will see Capture, Live, and Overlay Targets along with a list of all the render targets in our scene. The Capture Target is what the final recorded Snap will be, the Live Target is what is visible to the user (useful if you want to include a user interface but hide it in the final product), and the Overlay Target is intended for the new AR-enabled Spectacles 4. If you click on the Live Target box, you can select the BW render target and the Preview Panel will update! As we are creating our separate render targets, we can swap out the Live Target to fine tune each individual effect before setting it back to the original Render Target. As far as the Render Order goes, let's keep the Render Target at the bottom because that is we will be sending our final effect. You can click the three little dots on the left and drag to reorder the render targets. Now that we can see our blurry B&W effect again, adjust it to your liking.
Now for my second effect, I am going to follow the same steps: new render target, new camera, new layer, move my post effects to the new camera/layer, reorder the render targets, switch the Live Target to adjust the effect.
Bringing it all together
Okay, head into your Scene Config and set the Live Target back to the original render target. In the Objects Panel, add a new Screen Image. This will also create an Orthographic Camera for us and it will already be outputting to the original render target. If you want, you can also delete the original, default camera in the scene.
Select the Screen Image and choose the BW render target as the texture. The Stretch Mode of "Fit" should be fine, but I'm a little paranoid so I set mine to "Stretch" just to be safe (the render target is the same size as the screen, so in theory the image should be filling the whole screen already). For my overlay I am going to duplicate the screen image, change the texture to my other render target, and then scale the image down a bit. On this resized image I don't want to use a "Stretch" fill mode - I'm going to go with "Fit."