Style Transfer with SnapML

In this tutorial we'll go over how to use SnapML to create a style transfer lens. You can see an example of this by clicking here or by scanning the snapcode below.
What is style transfer?
Painters create art in their own particular style - Bob Ross is known for his peaceful landscapes, Picasso for Cubism, you get the idea. An artist's style is made up of their brush strokes, color palette, shapes, patterns, and techniques they use to create their paintings. With style transfer, a neural network takes an image, "learns" the style, and then applies that style to a new image. Wonder what a cubist Bob Ross painting would look like? Just train the style transfer model on Picasso and then apply it to a Bob Ross painting. Style transfer can yield some pretty amazing results, and through the use of SnapML, we can create style transfer lenses in Snapchat.
Gathering our images
Before we can train our style transfer model, we need two images - a test image and a source image. The test image can be anything, but I like to use an image of a person.
Our source image is going to be the image whose style we want to emulate. You can use famous paintings like van Gogh's Starry Night or something more ridiculous like an image of spaghetti. For this tutorial I am going to use "Young Man with a Fountain Pen" by Diego Rivera. Make sure your style image has a distinct style that the neural network can learn - make sure there is something interesting about the color palette, patterns, shapes, etc. Once you have your style and test images, save them to your computer. I recommend keeping the names pretty simple like "person" or "style-image" and avoid using spaces in the filename.
Training the model
Now that we have our images, it is time to train the model. Don't worry if you've never trained a neural network or even written a line of code before - the Lens Studio team has kindly provided all the code we need. Go to the Style Transfer page on the Lens Studio website and find where it says "download our example notebook" to download the code and then go ahead and unzip it.
Training neural networks takes a fair bit of computing power and software setup, so we are going to train our model in the cloud with Google Colaboratory (or Colab for short). You will need to sign-in with a Google account to use Colab. Once you are signed in, there should be a window where you can create a new notebook. Up at the top right, select Upload and then find the style_transfer.ipynb file that we downloaded from the Lens Studio site.
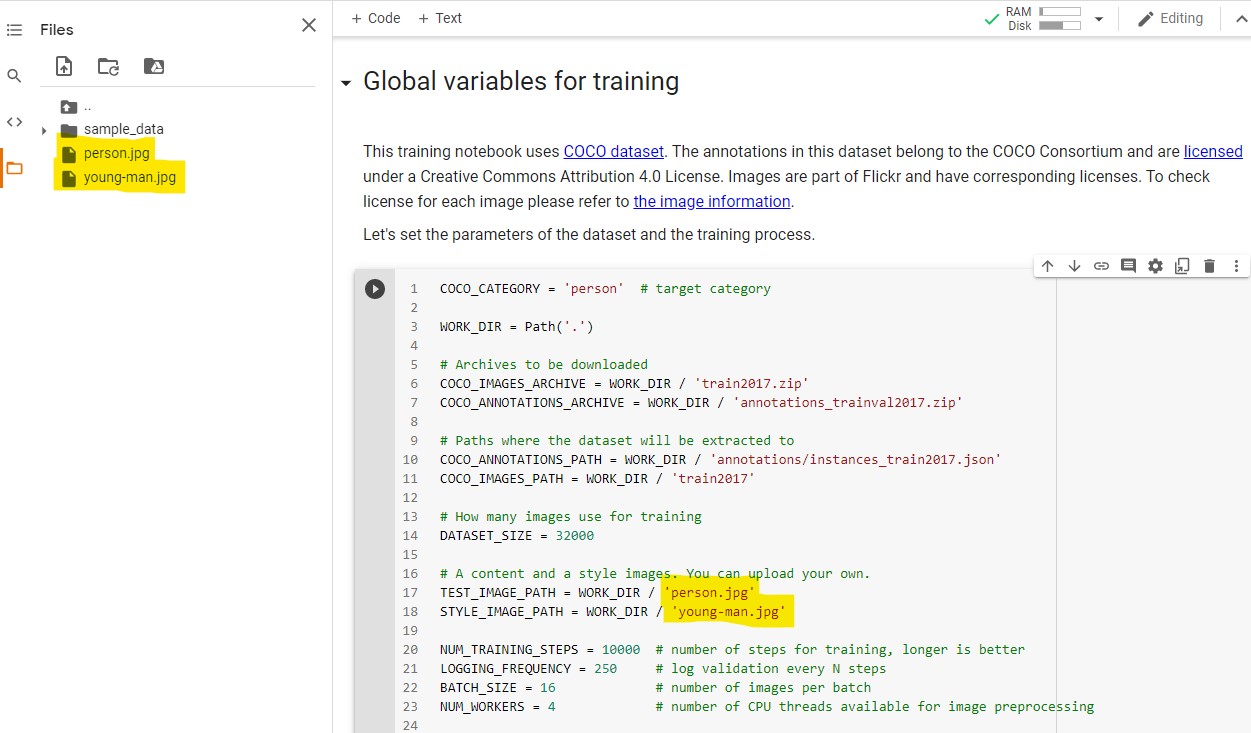
This notebook that we uploaded contains all the instructions and code we need to train our style transfer model. But before we begin, we need to also upload our test and style images. Once you've uploaded your files, scroll down to the "Global variables for training" section and replace 'test_image.png' with your test image filename (make sure there are single quotes around it still) and do the same for 'style_image.png' with your style image.
Now that we have our files named, we don't need to touch any more code. Open up the "Runtime" menu and select "Run all" to start the training process. You can follow along as each block of code does its thing. Before the model can start training, the code will install a few libraries and download some additional data which will take some time. Once all the setup is complete, the training will begin and you'll be able to follow along as the model learns the style. This process will take a few hours. Once the model finishes training, download the .onnx file (you might need to refresh the file browser to see it).
Google Colab is free to use, and because of that it does come with some limitations. Even though your model is being trained in the cloud, you CANNOT close your browser tab. It must remain open or Google will terminate the process. You also can't walk away and leave this to train overnight; Google expects to see the tab is active. You don't need to sit and stare at it while it trains, but keep the tab open and occasionally scroll through it. If Google terminates the process, you will have to start all over again. Even if the model is finished training, a terminated process will delete the final model, so be sure you stick around and download the finished product.
Using the style transfer model
Open up the "Style Transfer" template in Lens Studio. I recommend using the template vs doing it from scratch because the template includes a script that will adjust performance depending on the user's device. Once you've opened up the template, import the onnx file you must downloaded. You don't need to adjust any of the options in the window that appears, you can just click Import.
Select the ML Component in the Objects Panel and then in the Inspector Panel swap out the Model for the one you just imported. You should now see your style take effect!