Master the Tween Script in Lens Studio

If you need to animate anything inside Lens Studio - position, rotation, scale, opacity, etc. - the Tween script is your best friend. Now don't be intimidated by the word "script" - you don't need to write any code to use the tween script. All you need to do is configure a few settings and you are good to go!
Adding the tween manager script
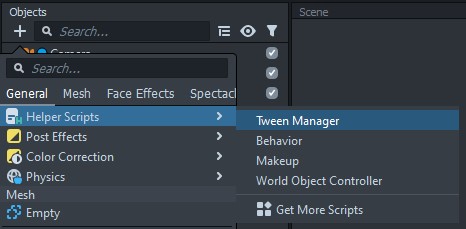
Before we can start using the tween script, we need to import the Tween Manager. We do this through the Objects Panel and can find the Tween Manager either by searching or by finding the Helper Scripts section.
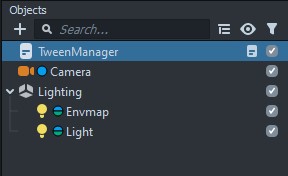
Depending on what you have selected in your scene, the Tween Manager may be added at the top level or nested under another object. You'll also notice a bunch of objects and text added to your scene. Expand the TweenManager object and delete the examples. Then, and this is important, click and drag the TweenManager all the way to the top of your object list. When a lens starts up, Lens Studio (or Snapchat when it is running on your phone) will start at the top and run down through everything. Each tween script you add to your lens relies on the TweenManager, so before any of those can run the TweenManager needs to be running. You don't need to do anything else, simply move it to the top of your scene hierarchy.
Tween types
Lens Studio gives us a few different tween types to use in our lenses. The tween type you use will depend entirely on what you want to do.
- TweenTransform is for moving, rotating, or scaling objects.
- TweenScreenTransform is similar to TweenTransform but geared towards two dimensional objects (like Screen Images).
- TweenColor is for transitioning a material's color.
- TweenAlpha is good for fading objects in and out.
- TweenValue will transition between two numbers and is great for scripts, material properties, and VFX properties.
- TweenChain lets you run multiple tween scripts either in sequence or all at once.
Tween settings
This section is not very exciting, but it's good to run through our various options before we start adding tween scripts.
- Scene Object If you don't specify this, the tween will act upon whatever object the script component is attached to. You'll probably be leaving this blank most of the time, but if you ever need/want to place your tween script elsewhere, you can use this field to tell Lens Studio which object should be affected.
- Tween Name If you want to use a Tween Chain (more on that later) or trigger your tween from a script (also more on that later), you will need to specify a name for the tween.
- Play Automatically If enabled, your tween will start as soon as your script component is triggered, which by default is when the lens starts.
- Loop Type This option determines if your tween repeats or ping pongs. The ping pong option means your tween will run, and when it is finished it will run in reverse back to the beginning.
- Type When applicable, this setting will let you choose the type of change e.g. moving, rotating, or scaling.
- Movement Type When applicable, this option will let you choose what the reference point for your tween is.
From/Tolets you specify the starting and ending points for your tween.Towill take your objects current starting value (e.g. position) and then tween it to what you have specified.Fromis similar toTo, but it will take your object's current position as the endpoint and start from what you specify.Offsetwill take your objects current position (or scale or rotation) and shift it. This is especially helpful if you want your object to move across the screen but don't necessarily care about the starting and ending values. - Additive This option will appear when your Movement Type is
Offset. You also need to set the Loop Type to "Loop." If disabled, your object will reset to its starting position when the tween finishes. If enabled, your object will continuously be transformed - for example it could keep rotating indefinitely. - Start & End This is where you specify the starting and ending values for the tween. Depending on what Movement Type you selected, the starting or ending fields may not be present.
- Time This option specifies how long the tween will last and is in seconds.
- Delay This option will specify how long to wait before running the tween. It is also specified in seconds.
- Is Local This option is useful if the object you want to tween is the child of another object (like if it is tracking to the user's face). If you disable this option, then the start and end values will all be in world space and the object will not be affected by any parent objects.
- Easing Function This option determines how the tween value changes. If you want a constant change, Linear is what you'll want to choose. The other options can provide stylized motion (bounce, elastic) or more natural looking motion (quadratic).
- Easing Type This option specifies to which portion of the movement the easing function should apply.
There is no specific combination of easing function and easing type that I recommend using. It all depends on what you want your motion to look like so I suggest playing around with a few different combinations.
Example - TweenTransform - movement
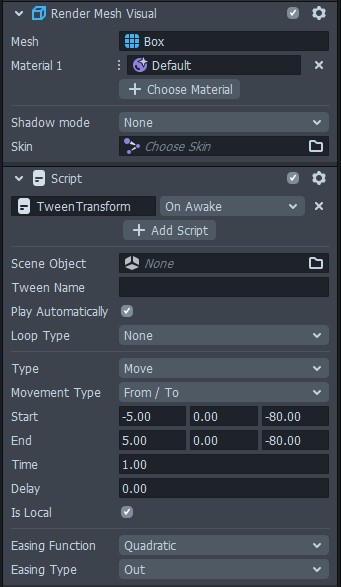
There are a lot of different parameters we can change, so let's start working with the TweenTransform script to see what they all do. I'm going to start by adding a Box to my scene so we have something to transform, and then I'm going to add a new script component to my cube and select the TweenTransform script from inside the Tween -> TweenTypes folder. Don't add the Tween script to your object, make sure you are grabbing things from the TweenTypes folder. If you are following along, you may notice that even if you moved your box to be visible to the camera, it disappears once you add the TweenTransform. Don't worry, if you take a look at the Start and End values for the TweenTransform you'll see that it is placed at (0,0,0) which is right where the camera is. Go ahead and change your start value to (-5,0,-80) and your end value to (5,0,-80). You should now see the box move! Once it stops simply reset your lens to see the motion again.
Now let's add a Head Binding (go ahead and delete the included occluder object if you like) and make the box a child of the head binding. I'm also going to make the following changes to my tween settings:
- Loop Type: Ping Pong
- Start: (-5, 30, 0)
- End: (5, 30, 0)
- Delay: 1
Now my cube is moving back and forth across the top of the user's head. This still isn't the most exciting thing in the world, but now we are starting to see the power of the tween script. I could replace my cube with some sort of graphic or animation and I'd be well on my way to having some sort of cyberpunk or Iron Man style display.
Example - TweenTransform - rotation
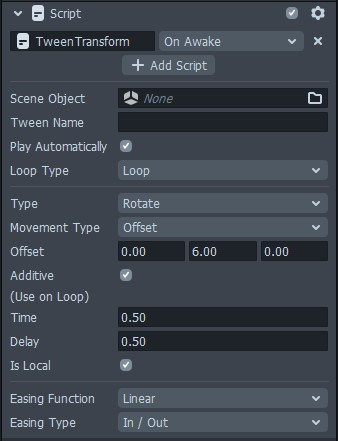
One issue people sometimes run into is trying to get an object to rotate continuously. I'm going to add a box to my scene, position it so I can see it, then I'm going to add a TweenTransform script to it. Rather than try to get it to rotate from 0 to 359 degrees, I am going to use the "Offest" Movement Type. Here are my tween settings:
- Loop Type: Loop
- Type: Rotate
- Movement Type: Offset
- Offset: (0, 10, 0)
- Additive: Enabled
- Easing Function: Linear
- Easing Type: In/Out
Now my box is continuously rotating! I can adjust the speed by changing the Time or by adjusting the Offset. What is nice about using rotation offset is that I can adjust the x and z angles of my object and it will keep rotating around the y axis (which is the axis I choose to use). You can also get fancy and add a delay to have a stepped rotation.
You may need to reset your lens if you adjust your object's rotation while the tween script is running.
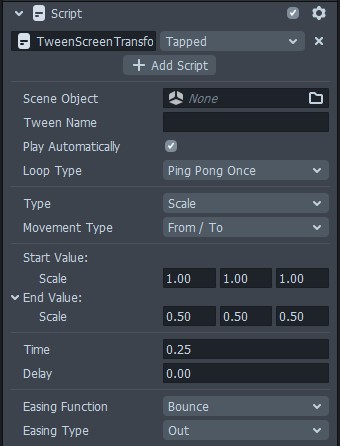
Example - TweenScreenTransform - scale
A great way to add some pizzazz to buttons is to have them react to being pressed. I've added a screen image to create a simple button. My button isn't actually doing anything, but you can use a Behavior Script to make it do something (this tutorial is focused on the tween script so we won't be going into any details about making buttons actually do anything).
We could add a TweenTransform script, but since this is a Screen Image with a Screen Transform, we can also use the TweenScreenTransform script. Here are some example settings:
- Script Trigger: Tapped
- Loop Type: Ping Pong Once
- Type: Scale
- End: (0.5, 0.5, 0.5)
- Time: 0.25
- Easing Function: Bounce
Now whenever you tap on the button, it will scale down then back up as if it had actually been pushed down. Animated buttons are a small detail that can help add a lot of polish to your lenses.
Example - TweenChain - motion sequence
Individual tweens are great for simple motion, but they don't work so great if you have a sequence you want to follow. I added a box to my scene and I want it to move right, down, left, then up - right back to the starting position. I could try setting up my four tweens with delays, but it is a lot easier to use the TweenChain script. But before I can do that, I need to setup my four individual movements.
I've placed my box at (-8, 8, -60) in my scene. Each motion is going to involve moving 16 units. I could calculate out each starting and ending position, or I could just specify the offset for each movement. Here is my example tween for the motion to the right:
- Tween Name: "right"
- Play Automatically: Disabled
- Movement Type: Offset
- Offset: (16, 0, 0)
- Additive: Disabled
- Easing Function: Linear
- Easing Type: In/Out
Once I have that tween setup all I need to do is copy and paste it and I can setup my down, left, and up movements. Once I have those ready, then I can add my TweenChain script. All I'm going to do here is change the Loop Type to "Loop" and then click on the "+ Add Value" button four times in the Tween Names section. Then I'm going to add right, down, left, and up. Now my box will be continuously tracing a square on the screen!
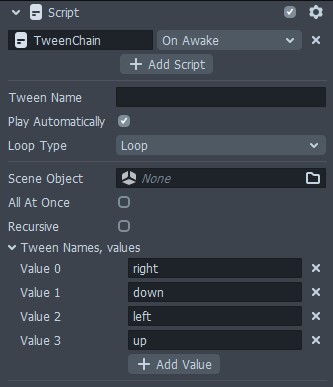
You may notice a few new options on the TweenChain script. The "All At Once" option will run all the tweens at the same time rather than in order. In this example we didn't want that, but if you have multiple tweens that need to happen at once then this comes in handy. The other new option is "Recursive" which means the TweenChain script will check the children of your object for the tween names to run. This is helpful if you have a hierarchy of objects.
The TweenChain script can also be given a Tween Name. This means you can chain together multiple chains. Just keep in mind that having too many things going on at once can affect lens performance.
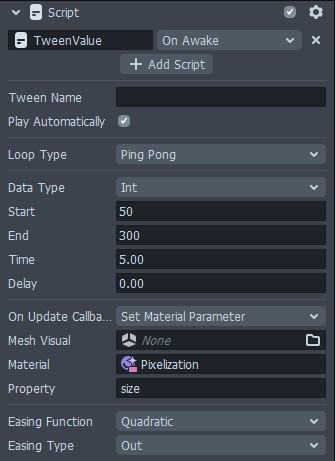
Example - TweenValue - material parameter
We can also tween material parameters. I've added a Pixelization post effect to my lens, then on my camera I've added a TweenValue script. If I look at the Pixelization material, there is a Size parameter that can go from 0 to 720. I don't want to transition across that entire range, so I'm going to pick something like 50-300 for the Start and End values on the tween script. I'm going to keep the Data Type as Int, but depending on your specific parameter feel free to change this. I'm also going to increase the Time to 5 seconds and set the Loop Type to Ping Pong.
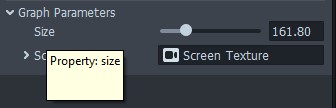
So far nothing is happening to my pixelization effect. The TweenValue script is running, but we need to tell it what value to be changing. Change the On Update Callback setting to "Set Material Parameter." You can leave the Mesh Visual field blank, but select the material for the Material setting. Now, what is that Property setting? If you select the Pixelization material and hover your mouse over the word "Size," you'll see a little tooltip box appear that says "Property: size." That is what we want to put in the Property setting on the tween script.
Once you've done that you should see the pixelization effect transitioning between super pixelized to not as pixelized.
Example - Scripting - recieving tween value
For more complex lenses, you may run into a situation where you need to monitor the current tween value or do something with it outside the realm of what the tween scripts can do. For this we can use the TweenValue script and specify a callback function to receive the current tween value.
The first thing I'm going to do is create a new script and add it to our scene. We'll keep things pretty simple so we can focus on making sure the tween script can communicate with our script.
function receiveTweenValue(tweenValue) {
  print(tweenValue);
}

script.api.receiveTweenValue = receiveTweenValue;
All I have here is a function which receives one argument and prints it out to the logger. Then I am also exposing this function through script.api which makes this function available to other scripts.
Next I'll add a TweenValue script. I'll have it Ping Pong a value between 0.0 and 1.0 over 5 seconds. For the On Update Callback setting I'll choose "Call API function" then find my script for the Func Target Script. In the Func Name I put receiveTweenValue which is the name of exposed function. Now in the logger I should be seeing values between 0.0 and 1.0 printed out.
Example - Scripting - controlling tweens
You may run into situations where you need to use the tween script but you don't know what the starting and/or ending values should be. Not to worry, you can set those values dynamically via a script along with starting and stopping tweens.
The current tween scripting API does not let you change the duration of the tween, only the starting and ending values.
Once again I want to keep things simple so we can focus on the tween part of things and not so much our custom logic. I've created a short script and added it to my scene. Initially you'll see an error in the logger, but once you choose an input for the script the error will go away. For this example the Movement Type on the tween needs to be "To."
// -----JS CODE-----
// @input SceneObject box

var X_RANGE = 10;
var Y_RANGE = 20;
var Z = -40;

function generateRandom(range) {
  return range * 2 * Math.random() - range;
}

function moveBox() {
  var newEnding = new vec3(generateRandom(X_RANGE), generateRandom(Y_RANGE), Z);
  global.tweenManager.setEndValue(script.box, "box_move", newEnding);
  global.tweenManager.startTween(script.box, "box_move", moveBox);
}

moveBox();
What this script is doing is generating random positions, setting the end value of the tween, then running the tween. You may notice that on the line with startTween that the moveBox function is included as a function argument. This tells Lens Studio that once the tween is done running, to call that function. In this case it generates a continuous process of updating the endpoint, running the tween, etc.