Create an old-fashioned reduced or stuttered framerate in Spark AR

There are lots of filters simulating vintage cameras by adding grain or by adding a black and white or sepia effect. What's missing is the choppy framerate of old video cameras. In this Spark AR tutorial you'll learn how to simulate a reduced framerate to take your vintage camera effects to the next level. You can view an example of this effect by clicking here or by scanning the code below.

Setting up the frame delay
For this example I am going to start with a blank project. Most of our work is going to take place in the Patch Editor, so if you don't have it open already go to View -> Show/Hide Patch Editor. The first thing we need to do is get the Delay Frame patch wired up and working. Fortunately, the official Spark AR docs have an example setup that works perfect for what we are wanting to do. Go ahead and recreate their example.
To recreate their example, you'll need a few resources setup. In the Scene Panel, select the Device and then click on the arrow next to Render Pass over in the panel on the right-hand side of the screen. This will create a yellow Device patch with an input for Screen Output.
Next, select the Camera in the Scene Panel and click the + button next to Texture Extraction in the right-hand panel. This will create a cameraTexture0 and place it in the Assets Panel. Drag this into the Patch Editor to create an orange patch for the camera texture.
Next let's add the rest of our patches! To add patches, you can either right click or click the + Add patch button at the bottom right of the Patch Editor. We will need the following patches.
- Delay Frame
- Shader Render Pass
- Mix
- Receiver
On the Receiver patch, click on the patch title to open a dropdown and select the Delay Frame option. Once you've done that, copy it once.
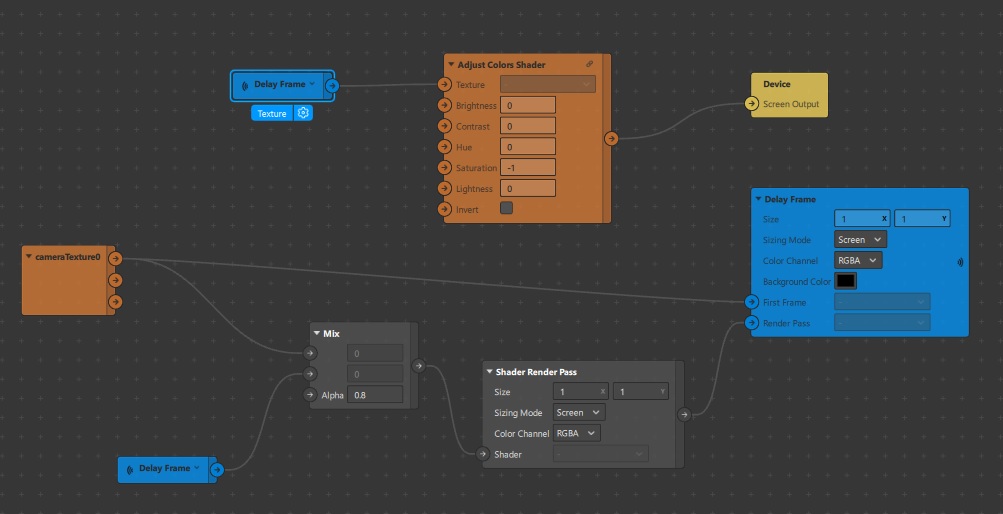
Now it's time to wire everything together! Take one of the Receiver patches and connect it to the Device patch. Connect the cameraTexture0 patch to the top input of the Mix patch and also to the First Frame input of the Delay Frame patch. The other Receiver patch connects to the middle input of the Mix patch. Connect the Mix patch to the Shader Render Pass and then connect that to the Render Pass input of the Delay Frame patch.
On the Mix patch, set the Alpha to something like 0.8. If you see a motion blur effect, it means everything is connected correctly! If not, double check all the connections and compare it to the Spark AR example. This Alpha value will be the key to creating our reduced framerate effect. If you set the Alpha to 0, it will look just like the camera texture. If you set the Alpha to 1, then the image will be frozen. By switching between 0 and 1 we can make it appear as if the framerate of our filter is reduced.
Since I'm going for a vintage camera effect, I'm going to go ahead and make everything black and white. In the Assets Panel click on the + Add Asset button and choose Search AR Library. Search for Adjust Colors and import it. Now drag the patch from the Assets Panel into the Patch Editor. Stick the patch between the Receiver and Device patches and set the Saturation to -1. Now you should have the same effect as before but now in black and white.
Reducing the framerate
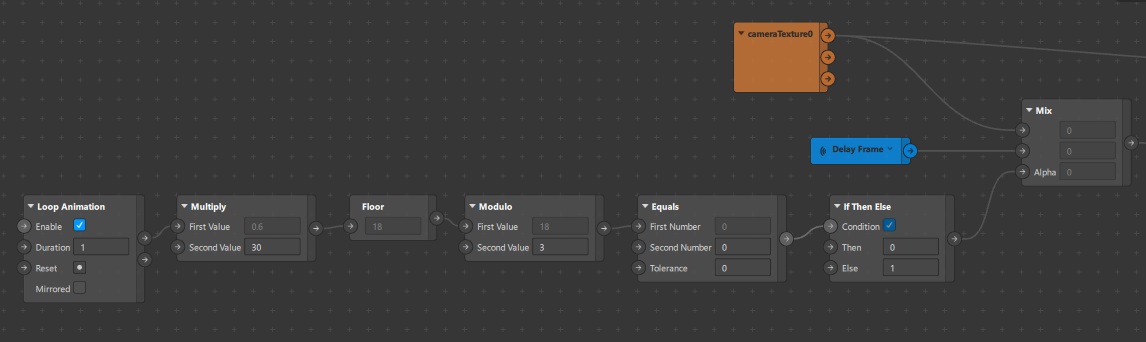
Okay, now we are ready to switch our Alpha value between 1 and 0 on the Mix patch to create that choppy look. Add a Loop Animation patch and leave the Duration at 1 second. Now add a Multiply patch and connect the Progress output of the Loop Animation to the First Value input of the Multiply patch. Set the Second Value of the Multiply patch to 30. Why are we doing this? Instagram filters run at roughly 30 frames per second. Our Loop Animation takes 1 second to run, and during that 1 second the animation progress goes from 0 to 1. By multiplying the progress by 30, we approximately get what frame of the animation we are on. Now the filters don't run at exactly 30 fps, but this approximation works well enough. Go ahead and also add a Floor patch and connect it after the Multiply patch. This will make sure we are working with integer values. Frame 12.5 doesn't make much sense, but frame 12 does.
So now that we are tracking which frame we are on, we can use that information to switch between the camera texture and the delayed frame. To do this, add a Modulo patch. The modulo operator (represented by '%') divides two numbers, but instead of giving you the result it gives you the remainder. So 3%1 is 0 because 3 is evenly divided by 1. 5%2 is 1 because 2 goes into 5 evenly two times (resulting in 4) and then we have 1 leftover. Connect the Floor patch to the first input of the Modulo patch and set the second value to 2. Now create an Equals patch and connect the Modulo patch to the top input. You should now see the First Number on the Equals patch switching between 0 and 1. Now let's use this information to control our framerate.
Create an If Then Else path and connect the Equals patch to the Condition input. Set the Then value equal to 0 and the Else value equal to 1. Now connect that output to the Alpha of our Mix patch. The motion blur effect should now disappear and instead we'll have our framerate cut in half because of the modulo 2! Let's walk through what is happening.
- On frame 0, 0%2 is 0 so our Equals condition is true. The If Then Else patch sends a value of 0 to the Mix patch which shows our camera texture.
- On frame 1, 1%2 is 1, so the Equals condition is false and we send a 1 to the Mix patch. This displays the frozen frame.
- On frame 2, 2%2 is 0 so we update what is displayed.
You can adjust the choppiness by adjusting the Second Value of the Modulo patch. A value of 2 gives you a framerate of 15 fps because we are updating every other frame. A value of 3 gives you 10 fps, and a value of 15 gives you 2 fps. The super low framerates probably aren't what you are looking for in the final effect, but they can help you check to make sure the effect is working.
Final touches
We already added a black and white effect, but let's add some grain as a final touch. We already have a tutorial on how to add grain, so here we are going to skip that part and instead focus on syncing the grain with our framerate. The grain doesn't have to be synced with the framerate, but it gives a more authentic feel if the two are synced.
Adding a Scene Render Pass
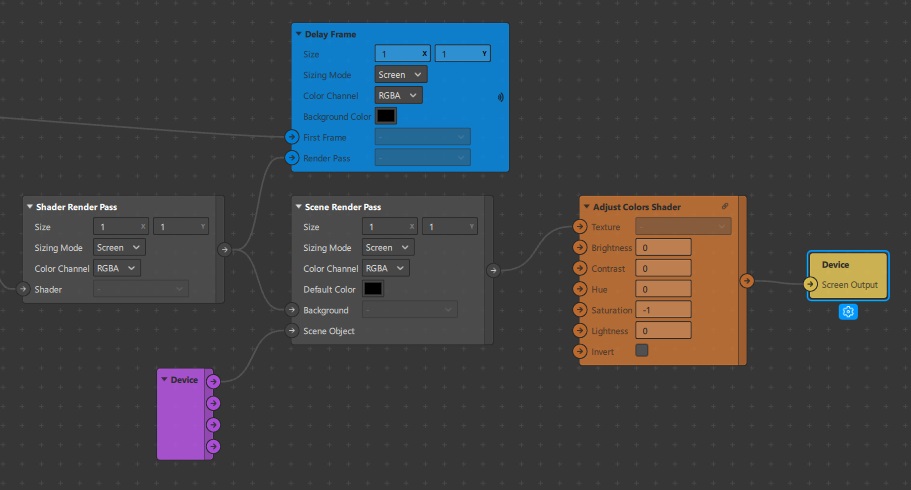
If you add a Rectangle and apply your grain material, you might notice it doesn't show up in the simulator. That is because we are grabbing the camera texture and applying our effect to that. To include our grain, we'll need to add a Scene Render Pass. Select the Device in the Scene Panel and then on the right-hand side of the screen click on the Create button next to Default Pipeline. This will add a purple Device patch and a Scene Render Pass patch. Connect the Shader Render Pass to the Background input of the Scene Render Pass, and connect the output of the Scene Render Pass to the Texture input of the Adjust Colors Shader patch instead of the second Receiver patch (you can delete that Receiver patch now). Your grain should now be visible in the simulator.
Syncing the grain with the framerate
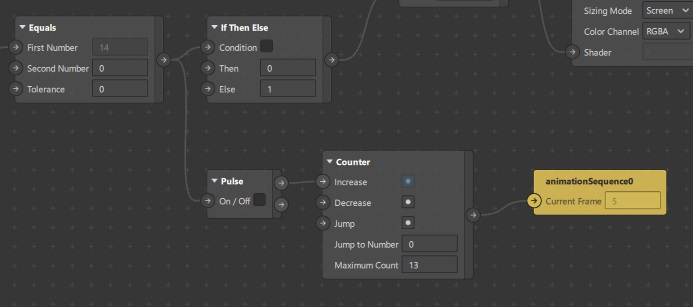
If you set the Second Value on the Modulo patch to 15, you'll see that your grain sequence is playing independently of the frame updates. Select the Animation Sequence in the Assets Panel and create a patch for the Current Frame by clicking the little arrow next to the property in the right-hand panel. Add a Counter patch and connect it to the animationSequence0 patch. Set the Mximum Count to the number of frames in the grain animation, and then connect the output of the Equals patch to the Increase input of the Counter. Spark will automatically add a Pulse patch in between. Now your grain animation is synced to the framerate of your filter! Feel free to set the modulo value back to whatever suits your fancy.