Stencil effect in Lens Studio

In this tutorial we'll go over how to create a stencil effect in Lens Studio. You'll learn how to overlay a simplified version of the user on top of the background of your choosing. You can see an example of this by clicking here or by scanning the snapcode below.

The approach
Our scene is going to consist of two main parts - the background and the foreground. We'll setup a separate camera and render target for the background to give us a little more control over things. Then we'll use the Material Editor to create the stencil look and overlay it on the background.
Setting up the background
The first thing we need are some images for the background. In the past I've used brick, concrete, and wood, but feel free to use whatever you want. You want something that would look cool with the stencil effect on top of it, so don't use images that have too much going on. For this tutorial I am going to use some images of paper that I got from Pixabay. Once you have some images, load them into Lens Studio.
Next create a new Render Target and name it 'Background.' Once you have that, create a new camera, put it on a new layer (potentially not strictly necessary, but I like to keep things organized), set the Render Target to the Background target you just created, and set the Camera Type to 'Orthographic.' Now add a Screen Image and make sure it is a child of this new camera and on the same layer. As it stands, we won't see anything going on in the Preview Panel because everything we just added is outputting to a non-visible render target. Just so that we can see what is going on, go to the Scene Config and select the Background render target for the Live Target (we'll switch this back in a bit). Now you should see a placeholder image for the Screen Image you added.
You can of course create this stencil effect with a single background, but I like to include several for the user to cycle through. This does require some scripting, but fortunately my Virtual Background tutorial covers that and we can just reuse the script from it. It's nothing fancy, but much easier to just copy-paste than to write from scratch. Here is the code:
// -----JS CODE-----
// @input Component.Image background
// @input Asset.Texture[] images
var index = 0;
script.background.mainPass.baseTex = script.images[index];
script.createEvent("TapEvent").bind(function () {
  index += 1;
  if (index >= script.images.length) {
    index = 0;
  }
  script.background.mainPass.baseTex = script.images[index];
  print("Tap");
});
Create a new Script, copy and paste the code, then add it to your scene (either as a new object or you can attach it to something like the camera you added for the background). Once you've added the Script Component, select the Screen Image for the Background parameter of the script and your images for the Images parameter. You should now be able to tap/click and cycle through the images. Your images probably won't be filling the whole screen, so select the Screen Image and change the Stretch Mode to "Fill." Now that everything looks good with the background, go back to the Scene Config and change the Live Target back to the original Render Target. Also while we're here, move the Background render target to be first in the Render Order.
Creating the stencil material
Now it is time to create our stencil effect. In the Objects Panel, create a new Screen Image (I also changed the fill mode to "Stretch" for it). This should create a new Orthographic Camera with your new Screen Image as a child. Now in the Resources Panel, create a new "Graph Empty" material, set the new Screen Image material to this new material, and then open the material in the Material Editor. All you should see is just a single "Shader" node.
Our approach here is going to be taking some input image (in our case the Device Camera Texture), turning it into a simple black and white version of itself, and then layering it on top of our background that we previously setup. To do all this, I am going to use a similar approach as in my Tritone Material to threshold the image by how light or dark it is, except before I do that I am going to slightly blur the image to get smoother edges. Let's walk through this.
Adding the blur
Start by adding Texture 2D Object Parameter, Screen UV Coord, Float Parameter, and Gaussian Blur nodes. For the texture parameter node I named mine as "Base Texture," the float I named as "Blur Strength," and then I wired everything up. For the Gaussian Blur, you will have to select the option to "Expose Size Outputs" on the texture parameter. In the Preview panel you might just see a bunch of pink boxes or something weird, so select your material in the Resources Panel and select the Device Camera Texture for the Base Texture parameter. Then you can use the Blur Strength parameter to control how blurry the image gets (if you set a min and max value on the node, the material parameter will turn into a slider).
At very high Blur Strengths, you'll start to see some weird artifacts and duplicate images. If you need a higher strengthed blur, add the "Gauss Blur" post effect and work with that. It seems to work better for whatever reason. We won't need high blur strengths for this particular tutorial, but it is useful to know.

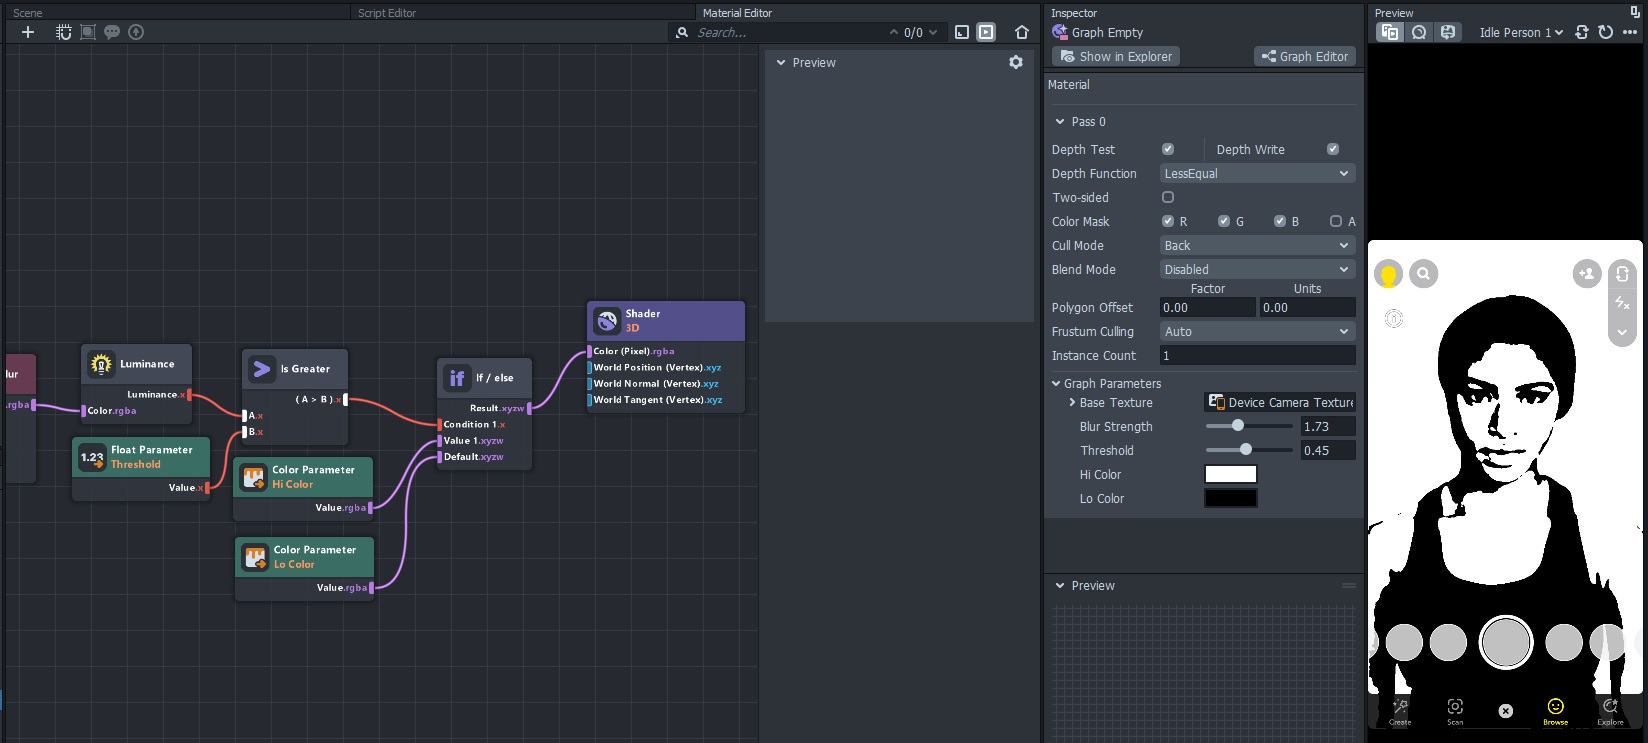
Adding the threshold
Now that we can blur our image, let's threshold it to get a two-toned image. Connect the output of the Gaussian Blur node into a Luminance node, send that to an Is Greater node, then finally into an If/else node and then into our Shader. For customizing our effect I'm also adding another float parameter for the threshold and two color parameters for the If/else. Once you connect all that, choose two different colors and adjust the value going into the Is Greater node. You should now have a two-color image in the Preview Panel. Upping the Blur Strength will smoothen out the edges, the Threshold will dictate how much of the image is one color vs the other, and then the two colors let you pick what ultimately gets overlayed. I recommend sticking with white for one color and starting with black for the other (but we'll be changing this color later to blend better with our background).
Overlaying the effect
Now it's time to see our effect in action! Add a Texture 2D Parameter node and a Blend node. Plug the stencil effect into the top output of the Blend node (this Base) and the new texture parameter into the bottom (the Color) and change the blend type to "Multiply." Now on your material parameters choose the Background render target for the new texture input. Now you have your effect!
Blending things in
We have our stencil effect, but it is kinda harsh right now. Luckily there are a few things we can do to blend it in better. The first and easiest thing to do is to change our black color to a different color that better suits the scene. For my paper background, changing it to a shade of brown helps blend it in better. It allows some of the background to show through which strengthens the illusion of my stencil actually being placed onto the background.
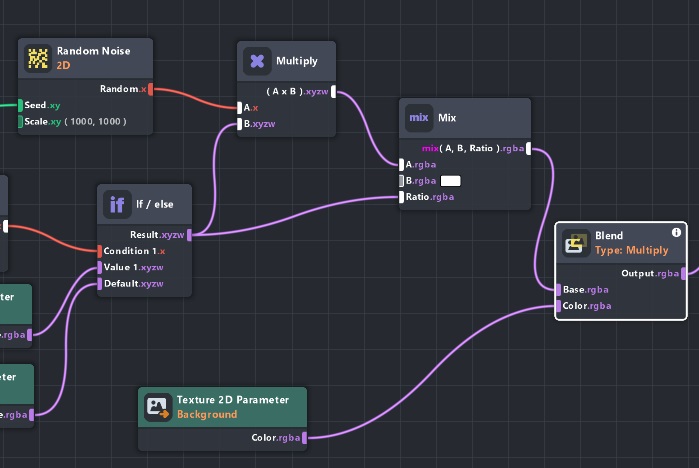
Something else that I find that helps is adding some noise to our stencil effect. Add Random Noise, Multiply, and Mix nodes. Set the scale of the noise to something like 1000x1000 and plug the UV coord node into the Seed of the noise, multiply it by our stencil output, and then mix that together with white using our stencil output as the Ratio. Then use that to blend with the background. Depending on your background, the noise may or may not help, but it is definitely worth trying.
Finishing up
There is nothing overly complicated about this stencil effect, but the little touches like the slight blur to smooth out the lines and then adding the noise to help blend things in help take this effect to the next level.